Welcome to A Stampers Paradise!

You've stumbled upon my escape from the daily grind! I hope you enjoy what you see here. I am a SU Demo who loves trying new techniques, holding card making classes, creating techniques of my own, and most recently blog design, I love anything stamping related! I hope you'll stay a minute and come again! I'd love to know you were here, so feel free to leave comments!

Sunday, December 21, 2008

Big Shot Bird...


This is the first card I made with my new Big Shot. It's simple, which I think may be my new style as I have been doing it for a couple of weeks now. The base of this card is Really Rust CS, the side panel is Old Olive. The Old Olive was run through the Big Shot with a Fiskars texture plate {I was excited to discover this works!), the edges torn and inked with OO ink. The image is from Serene Spring, a SU current Level 2 Hostess Set. I ran Watercolor Paper through the Big Shot with Sizzix Scallop Circle #2 die to get the scallop. Then I stamped the bird image onto the paper with Timber Brown StazOn ink. I watercolored it using Earth Elements WaterColor Crayons, and Aquapainters. The sentiment, also stamped in StazOn because it was already on my desk, is from Love Ya Bunches, a SU set from a few years ago. Lastly, there is a piece of Antique Brass Hodgepodge Hardware on the side holding my ribbon. This is for a friend who is having a rough time, and I hope it will cheer her up and remind her that I love her.

SU products in BOLD print. The StazOn and Sizzix items are from SU also.

*** This is one of my first 'real' attempts at watercoloring with Aquapainters, and I am in love! It is definitely time consuming, I spent about 15 minutes coloring this image, but I love the outcome. It's not as easy as I thought it was, and need more practice, but I think it's good for a first 'real' try.

Tuesday, December 16, 2008

Good news (for me!)

My Big Shot is on the way!!! It is being delivered this week, and I am SO excited. So, finally I will be able to step up and do some of the great things I see on blogs all the time! This is a Christmas present to myself. I will post with something I make using it the same day I get it, I bet!!!

Monday, December 15, 2008

3 More Christmas Cards...

Greetings, blog friends! I am posting 3 more of the cards I made last night. I made no more than 4 of each design this year, and I completely finished my cards last night!!! Whoo hoo!!! My husband put them in the mail this morning, and I am SO excited to have them done. Here are the 3 I did last night. Feel free to comment, I would love to know which you like the best. I am not sure how many different designs I did this year, but each card posted on my blog went out, and some didn't get pics taken before I sealed them. Next year, I start earlier!!!


If I had to name this card, I would it Silly Snowmen! I love this one, easy and fun! The base for this card is Ballet Blue, I stamped all over it with the snowflake from Perfect Presentation, then swiped all edges of the card in my Ballet Blue inkpad. I cut a piece of Basic Black CS down to 2 1/4 x 4 3/4, and punched the two long sides with the Spiral Punch to create the 'filmstrip'. This little snowman is from a SU set, I do not know the name. I stamped and colored about 100 of these last year for a card I never got around to making and it is a friends set, but I know it is some sort of tag set. One thing to know, you really need the Square Punches for these cards, but that's the one thing I do not have, so I punched them out with the Large Tag Punch, and cut the top of freehand. Glued those to the black strip, then on the card at an angle. The word JOY is from Perfect Presentation and I used Dimensionals to pop them up a little. That's it. This one was so much fun to make, and snowmen always make me smile.

I think if I had to name this card, I would call it Cheerful Christmas! I love these bright vivid colors, and they just scream Christmas! The base of this card is Baja Breeze, with a strip of Ski Slope DSP down the side (can you tell I am in LOVE with this paper?). I tied some red grosgrain (Offray 1/8" red) over the meeting point, then stamped the little snowflake from Perfect Presentation down the blue side. I stamped the tree from Perfect Presentation on Whisper White CS in Old Olive ink and layered over a piece of Real Red CS. There is a little red blingy on the tree, that's from Hero Arts. I stamped the word JOY from Perfect Presentation on scrap Whisper White CS and cut out and adhered to bottom of card with Dimensionals. Isn't it cheerful?


This one turned out fairly elegant for how little work was involved, and that's a good thing when you are in a hurry! I love the soft hue of Baja Breeze, and the card base is that color, as well as the snowflake DSP called Ski Slope. I used the Slit Punch on the bottom of the card to hold the sentiment, which is from Heard from the Heart. I stamped the snowflake from Scandinavian Season, punched with 1 1/4 circle, layered over 1 3/8 circle, layered over Brushed Silver (love this stuff!) CS punched with the Scallop Circle punch. I put a Filigree Designer Brad in the center, and stuck it on the card with Glue Dots. I hope it's not too simple, and the recipients like it!

Hope you like them all. SU products are in BOLD print, and I always try to give the brand of whatever I use that's not SU. Merry Christmas!

Friday, December 12, 2008

Another Christmas Card & My Little Angels


So, here is another Christmas card I am sending out this year. I do not do mass production of Christmas cards anymore, it just bores me to no end. This year I am sending about 10 different styles, and I really like them all. I have used the same stamp set on all of them to keep them similar, and I have also repeated several colors. This one is a really simple one, but I love it. I used Old Olive CS, and Ski Slope DSP on the side. Chocolate Chip ribbon is tied over where the papers meet, and I layered some Chocolate Chip CS over that with the tree from Scandinavian Season stamped in Old Olive on Naturals White CS. In the center of the flower on the bottom right of the tree, I added half pearls called Crystal Stickers by Mark Richards. I am hooked on these right now. They're already sticky, you just use a tool to pick them up and stick them on! On the bottom right of the card I added a little stamped image from Perfect Presentation, which was a hostess set last year, in Chocolate Chip ink. I love the simplicity of this card.


And here is the My Little Angel part of the post. A wallet size of this picture is going out in all my family Christmas cards this year. Grandparents and aunts will also receive it framed as a small, extra present. Hopefully I will have time to make my own frames. I am thinking of doing the acrylic blocks for clear stamps as frames, it just depends on how much time I have in the next 13 days! But, this is Chloe age 4,and Tara age 2 in their Christmas dresses.

Merry Christmas!

***All products are SU unless specified. The pearls on this card are not, and were purchased at Archivers in Raleigh NC.

Monday, December 8, 2008

I got a BLOG AWARD!!!


I am EXTREMELY honored to have been given this Blogger Award. It was given to me by a wonderful lady named Cheryl, she gave it to me a while back, and I never got a chance to put it up and was having PC issues. So, now I have time and the PC is ok. Please take a minute to visit Cheryl at http://neverenoughstamps.blogspot.com/. She is very talented, and her obvious love for Christmas will be an inspiration to you!

Now for the rules -
1. The winner may put the logo on their blog.
2. Put a link to the person who sent you the award.
3. Nominate 5 blogs.
4. Put links to their blogs.
5. Leave a message for your nominees.

This is definitely hard for me to do. I visit some pretty wonderful blogs, but here is my top five...

1. Siobhan at http://the-monkey-hut.blogspot.com/
2. Louise at http://punknscrap.com/
3. Erin at http://cardsbyfishlips.blogspot.com/
4. Lin at http://sticklesmade.blogspot.com/
5. Jennifer at http://paperpiekeepsakes.typepad.com/

Hostess Club Gift...


This is what I made every member of my Hostess Club as a thank you for being with me this past year. This past Sat was our last meeting (until the new club starts in Feb), and it was also our Christmas Party so I wanted to do something special for each of them. Here's how I made them:

I made 11 of these and it took HOURS...not a quick process, but could be done quicker with some shortcuts, I however am a recovering perfectionist and couldn't skimp, so they took forever...

I punched (for each ring) one piece of cardstock for all SU! colors minus the neutrals, as I feel black is black and white is white for the most part. I did In Colors, Bold Brights, Earth Elements, Rich Regals, and Soft Subtles. I typed up each color name, family name, and the SU front label on an Avery label template in MS Word, two per label. One sheet perfectly held every title with no space left. The front of the color ring is a piece of acetate, punched with Scallop Circle, behind that is a piece of DSP, then acetate, then colors, then acetate, then colors, etc. Each color family is divided by an acetate punch holding that color families name. The color families are in ABC order, the colors follow the order on the back of our marker box and catalog. After putting all of them in order and punching holes in the top (through a template I created for perfect holes) with my Crop O Dile, I found it can punch through 12 sheets at a time about halfway through the project...LOL!!! I put them on Book Rings in order. I then printed the labels, and got to work. The labels are precisely 1" tall which made it VERY difficult to line up as I used a 1" circle punch. You punch out every single label, then place them on the CS or acetate piece it goes with. Once punched these are hard to peel apart as well. So, that's how I made them. You could always just cut the labels in half, which would save hours, literally. They look great, though. Everyone really seemed to enjoy them.

I originally made them for matching embellishments from craft stores (I am not one of those demos who will cut your head off with Craft & Rubber scissors if a customer mentions a craft store). We all need things that SU! doesn't sell from time to time. So, they can take these with them to match colors as closely as possible. However, as I was assembling these, I couldn't help but notice amazing new color combos as different colors laid against each other. So, now it also serves as a scaled down Color Coach as well. When you are struggling to come up with new colors to use together, you can flip through this and get some inspiration.

Hope you all like it!

Live With Passion...


This is the card I came up with for my Dec hostess club meeting which was this past Saturday. It's quick and easy which was the goal as we had a Christmas Party in lieu of our normal meetings. All products are SU!. Cardstock is Chocolate Chip, Old Olive, and Very Vanilla. Ink is Chocolate Chip and Old Olive. Old Olive brads, Chocolate Chip 1/4" Grosgrain Ribbon. The stamp set is Inspired by Nature which I just bought last month, and this card is the first I created with it, now I am very much looking forward to using it some more! The sentiment was colored with markers, the edges of that CS were swiped on the Chocolate Chip pad. We punched one hole from the Spiral Punch in the upper right corner to hold it onto the ribbon, and used 2 Glue Dots to attach it to the card. This one is pretty self-explanatory. I really worried it would be too simple for my club, but everyone really loved it. It's clean and simple, and I am in love with this stamp set now!

Thursday, December 4, 2008

MIA...

I just had to apologize for not posting lately. I have been working on things for my stamp club this coming Sat, and I cannot post the things I have been working on until after that when the girls see them. They are surprises for them! My club is doing a Secret Sister Christmas Swap, and I have been making the gifts and packaging for that, gifts for each member, and projects for the meeting. I haven't had time to work on anything else. So, I will be updating my blog hopefully on Sunday with the things I have been doing! Sorry I have been MIA!

Friday, November 21, 2008

My Favorite Christmas Card so far...


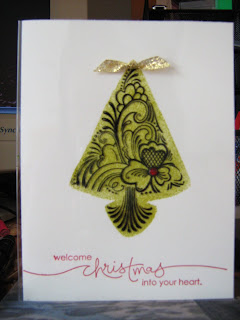
(Sorry for the quality of the pic, I find acetate VERY hard to photograph. IRL, the gemstone shimmers and the card looks bright and pretty.)

This is one of those cards that just proves the difference of quality in SU products vs others you find in stores. I attended an event at a local scrapbooking store and one of the make and takes was a Christmas card made exactly like this one. However, the products they used were much lower in quality and not as put together, and I liked the idea, but not the card they made. So, I recreated it at home using SU products, and the difference is unreal!

First I folded a piece of acetate for my outer layer, and stamped the tree from Scandinavian Season in the center a little towards the top with Jet Black Stazon. Then I made a stencil by doing that again on scrap acetate, and cutting around the tree with a hobby blade. I then folded some white textured CS and put between the acetate. I lined the stencil up under where the tree was and sponged it heavily in Kiwi Kiss ink with Stampin' Sponges. I stamped the sentiment from Heard from the Heart in RidingHood Red ink on the bottom of the white CS. I punched two 1/16" holes very close together at the top of the tree and ran Gold Cording through those, and used the cording to tie on the gold know you see. That is the only thing holding the acetate on the card, and it stays perfectly in place, I was amazed! I finished it simply by putting a red gemstone from Hero Arts on the center of the flower shape on the tree. Very simple card that's just a little harder than it looks, and I love the outcome.

Sometimes you just see projects and think, I can do that so much better. I know we all do that, but I am glad I acted on this one. It is remarkably better than the one made at the store, the quality difference in product is unreal.

All items in BOLD print are SU!

Scallop Medallion Christmas Tag


I love this tag! There's snow on the ground here today, we woke up to it falling beautifully and I am now in the Christmas spirit! The tag is made using the technique to make a medallion out of a punch. The tag size is 2.75 x 2.75 inches. I made the medallion out of the Ski Slope DSP, ran Old Olive ribbon through that, tied it up top with Gold Cording, and backed the whole thing with a folded piece of Chocolate Chip CS, folded in half. The inside is lined with Whisper White CS to write To/From message. I figured out how to make a small scallop square to fit inside this, cut a square of CS 2 1/8 inch, then line up in the Scallop Edge Punch center, punch on all sides. The snowflake is from a retired hostess set from last year called Perfect Presentation, it is a round stamp with words around the outside of the flake. I didn't have the exact size circle punch I needed, so I punched the flake out, and to cover the little bit of wording that showed around it, I ran the edges over my CC stamp pad. Popped on a Dimensional over an Old Olive circle. I didn't have any pearls small enough for the edges of the flake, so again I improvised (I am getting better at that!), I had some of the wedding pearls on a string from the craft store. I cut them off the string, and carefully sanded the edges down where they were glued on the sting. Glued onto my flake with Crystal Effects. Whew. Lots of work on one little tag, but I really like how it turned out. I have never used brown at Christmas, but this year I can't seem to stop myself. Hope you like it!

All items SU, minus the pearls, all SU colors, tools are in bold print.

Saturday, November 8, 2008

Scandinavian Christmas Card


This is the card my Hostess Club made today along with the tags in the last post. Everyone loved all the projects. This card is CASE'd from the Holiday Mini. The stamp set is Scandinavian Seaon, and the Scandinavian wheel. I really loved the example card in the Mini catalog, and decided just to change a few things about it. This card uses the New Ski Slope DSP, also from the new Mini catalog. I am so in love with this set, and new DSP! This is the first time I have used the New Tafetta ribbon (Kraft) and LOVED it, it's such a pretty, classy ribbon. This is a very simple card, but I loved the finished look! Part of the tree is double stamped, cut out, and popped up on a dimensional for a little depth, and the edge of the Naturals White cardstock is roughed up a little with a bone folder. Hope you like it! This is the FIRST Christmas card I have made this year, I guess I better get rolling, huh?

Wednesday, November 5, 2008

Scandinavian Christmas Tags


Here's a tag my club is making on Sat. I cut an Old Olive and a Naturals White oval using the CM cutting system. I stamped the mitten image from Scandinavian Season in red, and folded the paper in half at the bottom of the mitten, then cut out. The mittens actually open up to write the recipients name or a small message.

This is my favorite one. I used Kraft CS for the base, it's cut 3x6 and folded in half. I cut a square of Ski Slope DSP for the background, and glued down after sponging the edges in Chocolate Chip ink. The Poinsettia's (I hope that's spelled right) are made using the star image from Scandinavian Season and punched with the 5 Petal Flower punch (I actually discovered this myself!!!) to make the pattern on the flower petals (it has to be angled just right to fill up the punch). Then I pinched the ends of the petals and used glue dots to put two of them together, with a punched Old Olive piece underneath for leaves. Couldn't find dark brads, so I made dots with a Chocolate Chip marker, and topped with dots of Crystal Effects. I love the look of this tag.

I like this one, too. I used Baja Breeze and cut it 6.5x2.5 and scored at 3". I used the slit punch on the long end and out of the short end, punched a scallop circle out of the blue. Then I punched a Very Vanilla scallop, and glued down where the other scallop opening is. Used the snowflake from Scandinavian Season and punched out and layered on top. There are stickles all over the snowflake. The TO/FROM info is written under the scallop inside..

So, I used only ONE stamp set, except for the Merry Christmas, which is from Holidays & Wishes. Now to make a card for the meeting!!! Sorry the pics aren't the best, it's been raining here and I am short on time. Hope you like the tags!!!

**All SU colors and sets are in Bold print.

Friday, October 24, 2008

My Front Entry with Decor Elements...


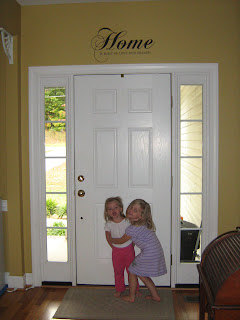
This is a close up shot of my new Decor Elements that I just hung this morning. I got it on my hostess month (Oct) for my club, and am in LOVE with it! I am amazed at the quality of this product now that I have actually put one on a wall. They are fairly simple to transfer, line up and retransfer, however I will never again do one 7 feet up, on a ladder, by myself. A small one would be fine, but this is 2 feet wide, and it had to be stretched apart (it cannot touch itself) while I climbed a ladder, and tried to tape it for placement. Definitely get help if hanging a big one high up!

This is a shot of how it looks from my living room. This adds SO much to my home. I CANNOT believe it. I keep walking by and looking at it (even though I really do have other things that need to be done...LOL). Well, my two little ones saw the camera and demanded to be in the shot with the new "wall sticker" (that's what Chloe calls it, she's 4). So, here is my decorated entry and my two angels. Don't mind the smears on the glass of the sidelights, they need to be cleaned, off I go!

PS---This particular Decor Element is only available to hostesses. It is a Level 2 choice, however SU has a growing range of these, and the brochure for it is on my sidebar. Also, I have an online ordering button there too if you see any you like and don't have a current demo.

Thursday, October 23, 2008

Flight of the Butterfly Set


Is there anything more exciting than opening up that fun box that the big brown truck drops off??? I don't think so!!! Got my club order in yesterday, and in it was my newly ordered Flight of the Butterfly set. I had so much fun creating this little set with it. I made a card with matching envie, bookmark and pen. These projects are for a workshop I have scheduled for next week. I hold classes, and run a full club, but have never done a workshop outside of my home. I am nervous that I will leave and forget something vital, or something silly like that! So, planning for this is much different than my clubs, classes, etc. These are non/new stampers. That means I can't turn to my love of techniques, I had to keep this clean and simple, and showcase my favorite SU products. For me that is our punches, our paper, our ink, and our stamp sets. I chose to use only one set. I am hoping possible future stampers will see how much you can acheive with a small selection of supplies. I kept it all the same color to make a little Thank You set for everyone to have on hand. The THANK YOU on the blue strip on the card is from All Holidays, I tried to incorporate the thanks sentiment from FOTB, but it wouldn't fit where I wanted it.

What do you all think about this as a workshop project? Never having planned for something outside of my club, I was unsure how much/little to plan to make, etc. Thanks for any comments on this one!

Supplies...
SU Cardstock in Chocolate Chip, Very Vanilla, Baja Breeze, and Kiwi Kiss.
Ink is Baja Breeze and Kiwi Kiss.
Punches -- Corner Rounder (it's CM,...shhh), Scallop Circle, Round Tab, 1 3/8 Circle, Handheld 1/16 for brads, Handheld rectangle for bookmark ribbon.
Stamps - SU Flight of the Butterfly (small Thank You from All Holidays)
Accessories -- Choc Chip Grosgrain ribbon, Silver brads, Dimensionals, Pentel RSVP Pen (filled with stamped printer paper, it rolls so much easier than CS), oh and a regular office stapler to really hold on that tab on the bookmark, as the ribbon is knotted under there.

Let me know what you think about this one. I think it turned out great, but how is it for a workshop?

Saturday, October 18, 2008

Stacked Thanksgiving


Well, this is one of those cards that you see one way in your head, then you try your very best to put on paper and you are unhappy with the finished result. I saw a tutorial on SCS for a step card and really wanted to give it a try. The fold is definitely easy enough, I just had trouble decorating it! As you can see, this card involved lots of watercoloring and LOTS of cutting. Suprisingly, it only took me about 30 minutes or so without stopping. I really don't think I like it very much, and would love to know what you all think about it. Is it too much, too little??? I used a SU set called Autumn Harvest, and Holiday Wishes. The folded part is Kraft cardstock, and I used a little bit of Chocolate Chip, the sentiment and images are on Naturals White, colored with WWC and blender pens.

This is a side view of the card so you can see how it's made. On a piece of cardstock cut down to 10.5x5, the folds are at 1.25, 2.5, 4.25, 6,& 8.25". I used retired In Color River Rock to stamp leaves all over the paper before folding it.

All Supplies are SU! I think I am about done with Thanksgiving cards, soon on to Christmas!!!

Friday, October 17, 2008

Firetruck Birthday...


This is a card I just finished, snapped a pic, and am blogging now so I don't forget. I just made this for a kids birthday that is coming up soon, a precious little boy (whose mama happens to check my blog, but that's ok:). Last month we were invited to a birthday party for another little boy and my friend has ordered these diecut, precolored firetrucks to use on his invites and thank you's. I usually don't use things on my cards like this, but she gave me some of the extras, and I fell in love with the cute little firetruck. I happen to have a Dalmation (among 2 other dogs and a cat), so the little dog on the back makes me smile. I used Whisper White for the background, then cut Real Red cardstock, and used the Ticket Corner Punch on the corners. Then I used the CM Cutting System to make the big oval in the red. Cut a smaller oval out of Basic Black and lined it up underneath. The masked section of the white base is sponged in Real Red ink, and I did the black dots to coordinate with the dog using Bitty Basics stamp set. The firetruck is popped up on several dimensionals and centered in the masked area. I stamped Happy Birthday from Bitty Birthday with Basic Black, punched with Small Oval, sponged edges with Real Red, and layered over black punched with the Large Oval punch. Set white eyelets in the corners. Tied Red Gingham ribbon through, taped to back of layers. Then glued the front down. Now, with using this little firetruck, I did have to add some things to it, so it wasn't so flat looking. So, I punched holes in the wheels and set silver eyelets for rims. I used Crystal Effects on the tires and the windows. I added Clear Stickles to the dogs collar, and the lights on the truck, and I used a Silver Metallic pen to add 'metal' to the handles, grill and bumper of the truck. Those extra touches really make the truck POP. I hope you like it!

Thursday, October 16, 2008

My Little Stamping Corner...


Well, I have been wanting to do this for a while. I know many, many stampers have full rooms devoted to nothing but stamping. I, however, am not so lucky to have that kind of space. I know there are others in the same boat. So, I wanted to share what I do with such a small space, and how I make it work for me. This first picture is of my workspace. I have two tables that just do fit together in my 4x4 area. As you can see, I use the white top one for my workspace.

For you to really get an idea of how small this space is, here is a shot of the entire thing from my back bedroom wall. To the right of the pic you can see my armoire, and on the bottom right you can see a little piece of the footboard of my bed. The black on the bottom left corner is a 2 drawer filing cabinet, this is where I store my cardstock. I can barely move the folders it's so full. On top of that are 4 12x12 paper trays where I keep my business supplies. Luckily, I am a hobby demo and do not need very many supplies:) Behind the cabinet under the desk are more clear shoeboxes holding Mod Podge, Acrylic Paint, rubbing alcohol, my Bind It All, and bindings, trash can, and a rolling 7 shelf plastic cart that holds all my 12x12 and DSP. Another thing you cannot see in the pic is at the bottom of the file cabinet is our cats food bowl, water bowl, and toy box. On the same corner of the chest at the end of our bed is his covered litter box. So, not only does my wonderful hubby share his room with my hobby, but with our furry baby!

And this is an ink pad holder that I made myself. I found a lady on SCS who had a link to her blog where she had a pdf file of the pattern she created to make this holder. I really need something else at this point, and am looking, but I have using this for a while now. It's made out of hot glue, and foam board, was made for less than $5, and it's sturdy! I just cleaned the craft corner, and picked it up full of ink pads! Pain to make, but I have the ladies file if you want to make one. Let me know! It holds about 60 ink pads. I have one row for each color family (not nearly all of my pads are in here in this pic!), and the last row for neutrals, and In Colors (the current ones). I keep Spectrum Pads, all of my VersaMark Pads, my Encore Pads, my Stazon Pads, and retired In Color Pads in one of the clear drawers on my shelves.

And this is where I keep my punches. Again, they are not all here, some are being loaned out, some just weren't on there when I shot this pic a few minutes ago. I am still in the cleaning process. These are the cheap-o curtain rods, that's it. I am getting ready to redecorate our bedroom, so these will be replaced with several Ikea Bygel Rails complete with baskets and cups for even more storage. For now, these work!

Here is the last picture. It is of the shelving unit above my workspace. Hubby bought and hung this for me, when most men would have griped about the work, or the huge holes in the walls (these have to be hung with huge anchors to hold this kind of weight). He's pretty great, sometimes, lol!!! Anyway, as you can see my stamp sets are on the second shelf, I am down to a very reasonable number of sets, however SU is sending me about 5 more this order alone! I sell the ones I find myself not using on a very regular basis. There is no telling how many sets I have owned, but I can only keep so much in this space. The bottom shelf holds tons of plastic drawer units. I used a label maker to label each drawer so I am never searching for what I need. I keep ribbons, eyelets, brads, refills, pastels, watercolor supplies, stamp cleaner, etc, etc in this. The third shelf holds my card box, my alter box, my tools, (crimpers, brayers, glue guns, a few clear stamps and misc stamps all in one clear shoebox. The top shelf holds things I hardly ever use, basically dust collectors! So, this is it. My main reason for posting this is I am always seeing (and drooling over...lol!) stamp rooms on SCS, blogs, etc. I know there are many people like me who just don't have the extra room in their homes after two kids, pets, playroom, etc, etc. So, I hope to inspire with my storage and organization ideas, an idea that may spark in you to have a hobby in a small space...

Happy Stampin' Everyone!

Monday, October 13, 2008

I'm Back!!!

Obviously by the number of posts I just caught up on, I am back from vacation. Many of you posted asking how it went, so I wanted to update on that. There were 17 of us staying in a huge, gorgeous beach house, just across from the water on beautiful Hilton Head. We had a great time, it is the first time my whole family has been together since I was a kid! The kids had a great time at the ocean. I brought home several whole sand dollars that I found, starfish, and an adorable mini conch shell. I will post a few pics when I upload them. I of course went shopping. I found a great surf shop about a mile from the house, and it seemed everything was on sale! So, I bought a cool beachy shell necklace, a t-shirt sporting the surf shops logo, and a pair of Rainbow flip flops for me, Reef flops for Jim and the girls. Can't believe how much I spent on flip-flops, or that there is another brand as pricey as Rainbows, but there is, and they are Reef's. I am madly in love with both brands at the moment! However, it's getting cool and I won't get to wear them too much, but they were on sale, so I had to buy them, right??? Well, maybe not, but I had to get a souvenier, right??? I would rather have new shoes than a keychain!!! The trip was wonderful, I had a blast with my family, and my kids did too. Thanks to all of you for asking. I will get some pics up ASAP! I missed you all and am glad to be back. However, I came home sick, still fighting that. I just got back from the gym, and caught up posting, now it's time to fix dinner. I will be stamping tonight, I hope, and posting again soon!

More Halloween Goodies...


This is a covered snack sized Kit Kat bar (or Copy Cat bar as my 4 yr old calls them). I simply scored the paper at measurements of the top of the bar so the sides would fold in around it. You wouldn't need to do this with DSP, but the cardstock is thicker. All edges are held together with Sticky Strip. The ends are run through the Crimper. I covered the entire top and sides with SU Glue Stick and shredded cotton balls for the spooky webbing. Pressed the shredded cotton balls into the glue, let dry. Then stamped pumpkins from Autumn Harvest on Tangerine Tango with Basic Black ink and cut out. They were glued on with liquid glue to really stick to the webbing. Punched 2 black Word Window Punches, and stamped Happy Halloween from All Holidays and punched that, too. Stapled them together at the end of the bar. I thought this turned out cute, and I hadn't seen anything like it before (besides the DSP covered Kit Kats that you see everywhere), so I had to post it. I had fun making it. ---The glue and cotton balls make a mess, have a wet paper towel or baby wipes handy!!!

***All supplies are SU!

Creepy Crawly Cutie!


This is a little guy that I prepared for my hostess club to make Sat. I have seen others do this with small circle punch eyes. However, they don't have enough character for me, I had to go googly! This little guy is a York Peppermint Patty! You need 2 Scallop Circle Punched papers in black, and 2 punches from the Photo Corner Punch in black and 2 punches from orange. Isn't he cute?

Look what Kelli made for me!!!


My Hostess Club meeting was Sat, and would you believe one of my club members and new friends brought me a gift??? I couldn't believe it! A Halloween treat made just for me! I love the clear paint cans, and she did a great job on this. She has stickles all over the spiderweb lid (which she freehanded!!!), and the pumpkins. Look at all the adorable ribbons! The webs and spideys are stickers on the sides! Oh, and you know what??? She filled in with candy for me (although my husband seems to think it's his!)!!! I just had to show everyone in blog world what my friend Kelli made just for me! Thanks so much Kelli!

Wednesday, October 1, 2008

Going On Vacation...

Wanted to let everyone know that my family will be on vacation until next week in Hilton Head. While I am looking forward to the trip, I will miss my blog buddies! I will update with a new project when I get back, although I have yet to figure out how to get through 4 days with no stamps, maybe I should take some, lol! I will publish any comments left over the trip when I get back, so they won't show up instantly. Hope you all have a GREAT weekend!

Tuesday, September 30, 2008

Spooky Spiders and Jack O Lanterns


This is a card I made my 1 yr old niece for Halloween. The base is SU Basic Black, as are the layers. The patterned paper is once again, from the $1.00 scrap pack I found in the Target Dollar Spot last week. The Jack O Lantern strip was just pumkpins, but I took the face from Autumn Harvest and stamped on them to make 'em spooky, but not too spooky for a baby! The word EEK under the spider is just written by me with a Basic Black SU marker in squiggles. And the best part....

It's a spiral pop-up card!!! Someone on SCS recently posted a tutorial on this technique, however, me being me, found a way to make it differnt. My pop-up is done with acetate, not CS, so you don't really see it when you open it. The Jack O Lanterns that pop-up are again just cut out from the cheap paper I found, and stamped with the face. Sorry, about the writing showing, I didn't think to photgraph it till I had already written in it. Hope you like it!

Thanksgiving Napkin Card...What???


Well, now I can say that I have done it all with napkins. From glass block nightlights, to home decor, to tile coasters, I have put napkins on every possible surface. This is the first card I have ever made with a napkin! I love it. It's no secret that Fall is my favorite season, the colors of Fall are my favorites, and Thanksgiving is my second favorite holiday. So, to all my loyal blog followers, you'll be seeing a lot of Fall!

This card is 5 3/8" x 5 3/8" square. I used Really Rust CS for the base. Here's how I did the napkin technique (I made this up today while straightening the box I store my napkins in!!!). Odds are, your napkin is more than 1 ply, you will need to separate all layers, until you have only the top image layer of your decorative napkin. I cut a piece of Kraft CS down to 5.25x5.25" and with my fingers applied a thin layer, completely covering the CS of Aileens Tacky Glue (you can also use Mod Podge, Aileens is quicker). Lay the sticky CS face down on top of the napkin (you will not want to lay the napkin on top of CS it will not go down without wrinkles/bubbles). With your brayer/rubber attachment (or scrap paper and your hand), smooth down the back of the CS. Turn over to reveal the image. Brayer the top lightly again to smooth any wrinkles. With a hobby knife, trim the excess napkin off. Now you have a card front that is gorgeous, fairly quick, and SUPER EASY! The CS will take a few minutes to dry. I suggest pressing it in a book between layers of wax paper to keep the CS straight, it's easier to glue to your card if it isn't rolled up from being wet.

Then I stamped Happy Thanksgiving from SU Holidays & Wishes on Kraft with Choc Chip ink. Wrapped gold cording (SU) around a small Really Rust piece of CS, tape down. Attach sentiment with dimensionals over the corded layer. I tied Choc Chip ribbon around the top, tied gold cording around the knot.

If I keep this up, I will have all my Thanksgiving cards done in record time! I usually only send them to family, with all I am whipping up this year, friends might get one too! I did this card when my youngest went down for an early nap, it only took me 20 minutes to complete (with drying time). I hope you'll try this for yourself!

Monday, September 29, 2008

Polished Thanksgiving

One of my favorite techniques is Polished Stone. Inevitably, I use it a lot, then I forget about it, then I always come back to it. It's the richest looking background, which I feel allows you to make a simple card, a WOW card. Here is my first Thanksgiving card for this year. I did it today at naptime. I am considering doing this for my Oct Thanksgiving Card for my club. What do you think?


The base is Chocolate Chip. The polished background is of course, done on Glossy White Cardstock. I used Encore (from SU) Metallic Gold, Pumpkin Pie, Old Olive, and More Mustard reinkers for the stone. I layered a piece of Kraft cardstock on the bottom part of the stone piece, and stamped Happy Thanksgiving from SU Holidays & Wishes in Choc Chip ink. Taped down Old Olive oval and ran old olive ribbon around the layers, taping behind. Glued face onto card. Ran Choc Chip ribbon around cardfront and tied it right of center over sentiment. Stamped pumpkin from SU Autumn Harvest on Naturals White CS. Colored with Old Olive and Pumpkin Pie WWC using blender pens. Taped that down over large oval and ribbon layers. Inside is layered with Naturals White CS and another small pumpkin (from same set) stamped on bottom right corner. I am calling it done, but I still feel like it needs some gold cording or something. Sometimes less is more, so I am leaving it alone! What do you think?

Sunday, September 28, 2008

Hippo Birthday... Catty CASE Challenge

In Sept, I challenged my hostess club to draw inspiration from or to recreate a project that is in the current F/W SU Catalog. Below you will find my example of the challenge...


This set is Pun Fun, and you can find the project I chose to case on page 61. As you can see, I left the layout exactly like the catalog example. I did change the colors. Have you ever before seen a Cameo Coral hippo? No? Well, me either, but I like it! I didn't have the felt flowers they used in the catty, so I stamped the flower image from Sock Monkey and cut it out and put a rhinestone brad in the center and stuck it on with a glue dot. Sewing is by hand, didn't feel like pulling the machine down, however I will make myself next time, by hand took too long. I really like how this card turned out! Sometimes, when I am out of ideas, I will look to the catty for inspiration. Usually not a blantant CASE, but I had to this time, as it was the challenge I gave out. I can't wait till the Oct meeting to see what everyone else did!

Happy Halloween Clear Treat Box...

I saw a lady on SCS with a tutorial for a clear treat box. Mine is not exactly like hers, but she did spark in me the urge to make some of these. Here is a picture of my first one, please forgive the many imperfections, I will be making more (now that I have learned from my mistakes). This would ideally be full of candy corn or candy pumpkins but I didn't have any on hand...


The bottom and top of box are SU Basic Black cardstock, the acetate is transparencies, the Halloween paper is something I picked up a scrap pack of in the Target Dollar Spot. I used SU Sticky Strip to form the box and acetate panels. Ribbon is threaded through holes made with the Crop O Dile for a handle. Front is layered SU punches, glue to the front, Happy Halloween sentiment is from SU All Holidays set.

Thursday, September 25, 2008

Breezy Vanilla Kisses


This card was made for two Splitcoast Challenges. CC185 Breezy Vanilla Kisses, color challenge using Very Vanilla, Baja Breeze and Kiwi Kiss. Blue is one of my least favorite colors, and I hardly ever use it in my projects, so this was the ultimate challenge for me. The second challenge was SC195 which is a sketch challenge, this week using three large, square layers stacked on the card front. I am not into an overage of layers, so I struggled with that as well. All in all, I like the finished product, and will not even begin to hint at how long it took me to complete. I did however, learn to like Baja Breeze very much!


This is the close-up of the flower detail on the front. A very decorative brad (from Making Memories I believe) complememts the SU Antique Brass HPH, which I am still greiving the retirement of. I used the circle piece to hopefully look like tendrils on plant stems, and the flower is the 5 Petal Punch, the 'leaves' behind it are the Scallop Circle Punch. This was a tough one, I like it, and I hope you do too!

--Also, the picture is slightly darker than the real thing, it's rainy here, so I can't get outside for natural light. I hope the texture, layers, and all the details of this card show up. The kissed BG isn't showing up that I can see, but I hope everything else is clear to you!

Cardstock -- Very Vanilla, Baja Breeze (&BB Textured), Kiwi Kiss (&KK Textured)
Patterened Paper -- Provo Craft...Heritage Post pad
Ink--Baja Breeze, Kiwi Kiss
Stamps-- Fresh Cuts, Canvas BG
Tools--Brayer, 5 Petal Punch, Scallop Circle Punch, Dimensionals, HPH, Decorative brad from Making Memories.
Techniques--Sponging, tearing, layers, kissed BG.
***All supplies are SU! unless otherwise noted.

Enjoy. As always, questions and comments welcome!

Wednesday, September 24, 2008

NEW Hostess Club Starting Feb 2009...

I wanted to go ahead and get the word out that I am starting a new hostess club in Feb 09'. The club I currently run ends in Dec of this year. Most of those members are rejoining for the next round, so to ease some of the financial burdens of the holiday season, we are taking Jan 09' off and restarting in Feb 09'. If you have a friend who is interested in stamping, or know someone who just needs a hobby, feel free to tell them about me and my club. At this time I plan to (based on number of stampers who join in), either run more than one club, or one large club, split into two separate meetings for smaller groups/more working space at the meetings. There will be ONE weekend class, and ONE weeknight class. I know weeknights will work better for some people, so I am glad to finally feel confidentally enough now that my youngest just turned 2, to be able to do a weeknight class. If you are already a customer of mine, and refer someone to join the new hostess club, you will receive a FREE Classic Stampin' Pad of your choice when they join us! If you are a current club member who has not yet let me know about the next club, please do so ASAP so I can figure out a basic count.

The current club focused on learning very simple techniques and basic stamping since so many members were brand new stampers. The next club will go a step further. We will do more 3D projects, gifts, things of that nature. We will always do at least one card each meeting, but in 09', there will always be a gift idea, or a 3D project, home decor, or something of that nature. We will focus on techniques that take a little more skill. I am looking forward to it! Beginners need not be afraid to join!!! Any newer stamper will be taught what she needs to know too!

Thanks in advance. I love all of you!!! I can't believe the wonderful new women that I have met through my short journey with SU!

Happy Stampin'

Bella Rose Card Organizer...

This is the class I offered my customers for September. For a $15 charge, they got a full pack of the Bella Rose DSP, wire binding for the book, the RSVP pens filled with matching paper (see this hanging by ribbon off the book), ribbon, calendar pages, and all the cardstock needed for the project. I have already held one of the two classes, and everyone had a great time making these, although I must admit part of the fun was chatting with the girls, drinking coffee, and eating Terry's incredible homemade coffee cake. Here is a view of the inside front cover, I created stamp pockets, which perfectly hold a book of stamps to have on hand for mailing cards....
And next is a view of the inside cover and front calendar page. Each page uses a different paper from the Bella Rose DSP collection and the calendar pages are all stamped to match. Feel free to contact me if you want a soft copy of my Excel Spreadsheet where I created these. I searched everywhere and never found one that I liked, so I made my own. I am happy to share:)
Everyone had to option of adding extra pages for cards that were not for birthdays/anniversaries which is what the month pages are for. I simply typed up the words in font that matched the month names, and punched them out to label these pages. There is THANKS, GET WELL, SYMPATHY/THINKING OF YOU, and the last page says MISC CARDS.
That's it for this one. Hope you enjoy it. If you want more info on this, feel free to leave a post/comment and I will get back to you!

Sunday, August 31, 2008

Flowers in the Window

This is a card that I should have had on here a month ago, but I just found it under my scrap paper! This was the swap I did for my hostess club's August swap. I am so in love with this new SU set, it's a Level 3 Hostess Set (free for hostesses!!!), called Window Dressing. Basically it is an adorable window with lots of cute images that can go in the window. Too cute. I stamped the window on Natural White paper, and using a craft knife, cut out the window panes. I then used the NEW Scallop Edge Punch to create curtains and added some DSP scraps to make wallpaper. I watercolored in the top 'fan light' window with a little bit of blue. Came out kind of dark in these pictures. I stamped the 3 flower image that also comes in this set, and cut each of them out (took forever, but was worth it!), then I colored them with SU markers, and used a 2-way Glue Pen to glue them in the window. The 'brick' on the house is SU Real Red cardstock dry embossed with a Fiskars plate. The fence is SU Close to Cocoa CS using the Scallop Edge along the top corner. I scored down each panel (between curves) to create wood slats. Added some wood grain with WWC and blender pens. Stamped, colored and cut out the little bird, who also comes in this set, used a glue dot to set him on the fence. Stamped the HB from It's Your Birthday Set, and threaded through some hemp twine, and tied around the fence. I put the whole card front together then glued it to a So Saffron base. Here is a close up of the flowers in the window...
Well, I need a better camera I think for all this detail stuff, but you get the idea. I hope you like this card! Oh, also, the shutters were scored along the 'hinged parts' and they are folded out so they are not laying flat. Lots of dimension on this one! Enjoy... It's a rainy day here AGAIN, so a card that's cheerful should make us all feel better.

A Gift for Grandma

I don't think there's much in this world more special than a Grandma. My grandma's birthday is the day before mine in late Sept. Our entire family (let's see how well this goes...lol!) is vacationing in Hilton Head in early Oct. So, since grandma lives hours away, and we only see her twice a year, I wanted to make something special to give her on the trip for her belated birthday. I made this card using the now retired Porcelain Prints DSP. Not Quite Navy and Mellow Moss were paired with it for this easy, but elegant card for Grandma. It matches her gift below.
This is a squash book that I made for my grandma's gift set! I made the covers out of chipboard coasters, covered them in paper, sanded the edges. I then attached the inside book part to the covers and decorated the front. Here's a view of it open...
The 4 big squares will hold pictures of my sister and I with our babies for my grandmother to forever cherish. She's one of those precious grandma's who is so proud of 'her babies'. The Very Vanilla triangles will hold journaling for me to write the dates of the photos, and little things the kids have been up to this year. Here is a close up of one of the inside panels...
Well, this picture is a little fuzzy, hopefully you still get the idea here. I stamped around the edges of the main photo mats, the edges will show around the pics, and I wanted it pretty! I stamped the word 'joy' on one of those pieces in NQN ink, as that's what her great-grandchildren are to her.

I will also be making a clear glass candy jar filled with her beloved sugar-free peppermints decorated to match this set. I will try to finish that tonight and add some pics of it so you can see.

What do you all think of this gift set I made for grandma??? I hope she loves it, as she is unquestionably the most wonderful woman I have ever met, and she has had such an amazing impact on my life.

Thursday, August 28, 2008

Domino Frame


Many of you answered my last poll about what you would like to see on my blog. Home Decor got several votes. Here is the first entry to my blog for home decor! I left the manufacturers photo in the frame so you could see what type of frame I used. This was purchased at Michael's (also known as the M store!), for $1.00! The dominoes are first edged in SU Pastels to add some color. Then they are glued (tricky to get it right, the domino part ends up much bigger than the frame), to the frame using Aileens Quick Drying Tacky Glue. I set a phone book on top of the dominoes until they dried to hold them in place. Once dry, I stamped images and words with Jet Black Stazon. Colored with blender pen and SU Pastels, and permanent markers. Some of the flowers are 'blinged' in the centers for a little sparkle. Will be sealed with matte sealer (after I run out and buy more, I am all out!), probably 3-4 light quick coats. This is my first attempt at this, and I have never worked with dominoes without sanding them first, so it was a little tricky as it's slippery to stamp on. To complete it, I will put in a cute picture of my two little girls together and put it in my almost 4yr olds room, colors in frame are pulled from her comforter. Enjoy!!!


Wednesday, August 27, 2008

Heartfelt Thanks

Sorry for the bad pic! Usually I shoot outside in daylight, but it's late at night, and I couldn't wait to post the card I made at nap time today! I used the new Pink Pirouette from SU's new In-Colors. Paired with Basic Black and Whisper White, it's very pretty. The only stamp set used was my all-time favorite, Heartfelt Thanks. The black strip down the side looks like ribbon (at least it supposed too LOL!!!, but it's actually a thin scrap of cardstock, one of my favorite cheap tricks! Two of the flowers are cut out and popped up on dimensionals (does SU sell stock in those things???), it adds so much! This card is so simple, yet I think it looks really pretty. I didn't want to over explain such a simple card, but if you have questions, (or comments!) feel free to post, I will always reply!

* Inspiration for this card is from a lady off of SCS! This is NOT my original idea. And I always try to give credit when credit is due! I changed a few things, but loved her card so much, I had to do my own!

Monday, August 18, 2008

Clear Birthday Card

A friend of mine has a birthday this week, so I sat down last night and made her this card! One thing I learned about clear cards, they are HARD to photograph! I propped the envelope behind this card so you didn't see the kitchen through it! This is an acetate card, with layered cardstock held in place with mini glue dots. The front panels hide the inside, and when closed, it looks like there's just tons of layers, but they are spread front and back on each acetate flap to create that illusion. I love this old SU set, I think it was in a Mini Catalog a couple years ago. There are 3 stamps that all say cute things, but look like eye charts! I used the New Scallop Edge Punch on the white layer. I stamped with Mellow Moss, and then in Perfect Plum. Of the Perfect Plum portion, I punched out only the DAY EVER part with the Word Window punch, and lined it with the Mellow Moss stamped image. Popped it up on dimensionals. Super easy card! However, acetate has a mind of it's own, and is not the easiest medium to work with. Hope you like it!