Welcome to A Stampers Paradise!

You've stumbled upon my escape from the daily grind! I hope you enjoy what you see here. I am a SU Demo who loves trying new techniques, holding card making classes, creating techniques of my own, and most recently blog design, I love anything stamping related! I hope you'll stay a minute and come again! I'd love to know you were here, so feel free to leave comments!

Showing posts with label Home Decor. Show all posts

Sunday, April 11, 2010

April Stamp Club Class...

For April's Hostess Club Meeting, I decided to go ahead and focus on a gift set that would work well for Mother's Day gifts next month. After tossing out many ideas, I settled on a bath set. What Mom doesn't need a nice, quiet bath? The candle holder includes a PartyLite tealight, and is wrapped with Rich Razz ribbon, and a scallop circle with initial. We had a few women use DSP scraps in the circle to give it as teacher gifts, etc. Great idea! The jar is a Starbucks Frap bottle, and is covered in CS and DSP, the lid is wrapped with white ribbon, and decorated the same as the front of the candle holder. We made Faux Suede Roses, using the Smooshed Flowers technique. They turned out lovely, and I think that was everyone's favorite part of the class! The jar is filled with Green Tea bath salts, which are wonderful! I kept the card simple using the Scallop Square Clear Die for the BS. Some Orchid Opulence CS, and Scallop Sq punches of DSP, we then added a sentiment (again, a few used a different one) to the Wide Oval, and finished off with the bird and branch from the 2-Step Bird Punch.

Complete project (aside from glass items) are SU only! There is also a white lunchbag altered into a gift bag to match the set! This was such a fun class, I think 'set' classes are my fave. And using the same products the whole time makes it easier to plan and clean up! Win, win!

---CS is Rich Razzleberry, Orchid Opulence, Whisper White, and Old Olive
---DSP is Cottage Wall
---Stamps are Whimsical Words and Lovely Letters
---Ink is Rich Razzleberry, and a White Signo Gel Pen
---Accessories are a few Circle Punches, Scallop Circle, Scallop Square, Wide Oval, 2-Step Bird. Also a Paper Piercer, Dimensionals, Glue Dots, R.R. Ribbon, Silver Brad.

Saturday, January 2, 2010

Torn Paper Frame and a Gift Box...

Every year I throw a Christmas Party for my Hostess Club. We do a drawing in Oct to get our Secret Sister, and we have to make them a homemade gift AND buy them a certain amount of SU items from their wish list and package them with SU products. This is by far my favorite event of the year! This year, I made a frame for my Secret Sister, Amy. I took a plain, unfinished wood $1 frame from a craft store, painted it front and back with white acrylic paint. I then tore several different patterns from the Ski Slope DSP pack. I used Mod Podge to adhere those all over the frame. I then applied another layer of Mod Podge over the top to seal it. I used Baja Breeze textured CS for the insert. I ran Old Olive and Real Red CS through my Big Shot with the Petals A Plenty folder, then punched them with the Ornament punch, as well as a Chocolate Chip piece with a Merry & Bright rub-on. Red and green are stuck on with Glue Dots, Chocolate is popped up on dimensionals. Silver cording finishes these off. I cannot stand empty frames and always fill them before giving. This can be a decoration, or you can put a holiday photo in it.

Amy had 3 ink pads on her Wish List, and those were within our 'budget', so I created a box for them. I started by stacking the 3 ink pads on top of each other, then measuring height, width and length. I added 1/4" all the way around for a nice lip on the box, then scored along the box measurements to make the bottom. I then used the same dimensions for the lid, altering slightly for the edges. I punched the top with the Scallop Edge border punch all the way around and stamped it with the Medallion background stamp before folding. CS is Kiwi Kiss and RidingHood Red (trying to use up retired colors!). I tied some RHR Tafetta Ribbon around the box, then punched the flower with the 5Petal Flower after running it through the Bis Shot with a CB folder. Brad is Making Memories, all other supplies are SU. I tied on a Scallop Oval with Red Twine to put her name on it, so she can easily remove it and reuse the box.
She seemed very happy with her gifts, and I really enjoyed making them!

Friday, October 24, 2008

My Front Entry with Decor Elements...


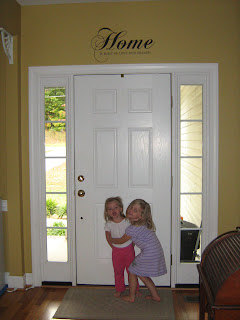
This is a close up shot of my new Decor Elements that I just hung this morning. I got it on my hostess month (Oct) for my club, and am in LOVE with it! I am amazed at the quality of this product now that I have actually put one on a wall. They are fairly simple to transfer, line up and retransfer, however I will never again do one 7 feet up, on a ladder, by myself. A small one would be fine, but this is 2 feet wide, and it had to be stretched apart (it cannot touch itself) while I climbed a ladder, and tried to tape it for placement. Definitely get help if hanging a big one high up!

This is a shot of how it looks from my living room. This adds SO much to my home. I CANNOT believe it. I keep walking by and looking at it (even though I really do have other things that need to be done...LOL). Well, my two little ones saw the camera and demanded to be in the shot with the new "wall sticker" (that's what Chloe calls it, she's 4). So, here is my decorated entry and my two angels. Don't mind the smears on the glass of the sidelights, they need to be cleaned, off I go!

PS---This particular Decor Element is only available to hostesses. It is a Level 2 choice, however SU has a growing range of these, and the brochure for it is on my sidebar. Also, I have an online ordering button there too if you see any you like and don't have a current demo.

Thursday, August 28, 2008

Domino Frame


Many of you answered my last poll about what you would like to see on my blog. Home Decor got several votes. Here is the first entry to my blog for home decor! I left the manufacturers photo in the frame so you could see what type of frame I used. This was purchased at Michael's (also known as the M store!), for $1.00! The dominoes are first edged in SU Pastels to add some color. Then they are glued (tricky to get it right, the domino part ends up much bigger than the frame), to the frame using Aileens Quick Drying Tacky Glue. I set a phone book on top of the dominoes until they dried to hold them in place. Once dry, I stamped images and words with Jet Black Stazon. Colored with blender pen and SU Pastels, and permanent markers. Some of the flowers are 'blinged' in the centers for a little sparkle. Will be sealed with matte sealer (after I run out and buy more, I am all out!), probably 3-4 light quick coats. This is my first attempt at this, and I have never worked with dominoes without sanding them first, so it was a little tricky as it's slippery to stamp on. To complete it, I will put in a cute picture of my two little girls together and put it in my almost 4yr olds room, colors in frame are pulled from her comforter. Enjoy!!!