Welcome to A Stampers Paradise!

You've stumbled upon my escape from the daily grind! I hope you enjoy what you see here. I am a SU Demo who loves trying new techniques, holding card making classes, creating techniques of my own, and most recently blog design, I love anything stamping related! I hope you'll stay a minute and come again! I'd love to know you were here, so feel free to leave comments!

Showing posts with label Swaps. Show all posts

Wednesday, August 24, 2011

The Theme is Summer Picnic...

Hey, friends! I am playing with a new swap group on Yahoo called JustCards. I love it! The theme for one of the swaps last month was Summer Picnic. I do not know why, but this theme freaked me out. I stressed  about it for days. I don't have many summery sets, and certainly nothing that screams 'picnic'. After wrestling with the idea of weaving red and white ribbon to create a blanket and punching out a sun and ants...Ding...lightbulb! I remembered this old SU set called Ladybug Picnic. I hadn't used it in years, it is a set my kids use in their crafts. Well, I pulled it right out and this card was made in minutes! It's clean and simple, but it works. The grass is Old Olive DSP cut along the top and roughed up a bit. The sky is done on a small layer instead of the background and I love the simpicity that lends to this design. I went down the side with a few matching buttons. The ants are stamped in Jet Black Staz-On and colored with SU Markers. It was fun...I don't know why I was so stressed! Hope ya'll like it!
Sorry about the low quality pic...it was shot at midnight as soon as the glue dried:)
All supplies are SU!

Wednesday, August 10, 2011

It's been a while...I am still alive;)


 Sorry friends! I have been crafting a lot less lately, but my poor blog has been completely neglected. I am trying to get back on track. I recently started a new business, so I had to put some of my stamping aside for a couple months. This card was a fun one to make! It was a sketch for a swap group I play in. If you like making and swapping cards, you should really check out JustCards on yahoo! It's a great group! I cut out the three circles, did the faux suede technique, then balled them up and smoothed them back out. They're layered to created a fun, textured flower. The white background is speckled with blue ink using the Color Spritzer tool from SU! A little tear in one corner, and she's done! I have many more projects to blog, so I hope you guys haven't given up on me;) Supplies are all SU!

Happy Stampin'!

Friday, May 27, 2011

It's a HeAtWaVe!

 Whew ya'll. It's hot in NC this week! Temps in the 90's with horrible humidity! This month's theme for a month long swap I play in is 'SUMMER', so every Monday, I mail a summer themed card to my assigned partner for the month. Here are two that I have sent to her! The first card was SO MUCH FUN! Nothing but punches used to create this fun flamingo! I saw a card VERY similar on a demo site, and tweaked it a little, and it's one of my favorites! The flamingo is made completely out of the 2-Step Bird Punch! It's all in the details....the sand is sprayed, everything is sponged, the water is crimped, the birds are doodled. It took a while, but it was worth it! I will be making a couple more! These would be fun summer birthday cards!
This one is a whole lot more simple. It uses Awash with Flowers stamp set, and the sentiment is printed using My Digital Studio from SU, which amazingly...my new printer produces the exact SU colors! Bonus!!!!

Hope you guys like these! Supplies are all SU, like always! I will see you soon!

Happy Stampin'

Monday, May 23, 2011

A couple recent Masculine Swaps....

 I have been a little absent from my blogging lately and I apologize! But...I HAVE been stamping away! These are two masculine cards that I made for a month long swap last month. I sent 4, but really liked these two! The top card uses my all-time favorite, and go-to masculine set...Lovely As A Tree. This card features the thumping technique and I love how it looks like a tree in Fall! A bit (well...a LOT) of twine finish this card off!
This card was made using River Rock DSP, stamped with VersaMark, clear heat embossed, then heavily sponged for the scene. You only vaguely see the striped detailing in the background. Effective for adding depth with my usual massive amounts of layers;) I left it sentiment-free, as it's a great all-occasion 'man card' and I thought she could add one later.

Hope you like these! If you want more detailed instructions, just contact me! I will be catching up here. On to other news....I am now a Miche Representative and will be focusing much of my stamping time to this new business venture! I am THRILLED to be able to offer such an amazing product line...I just might post some pics here soon;) No worries...I will always stamp!

Sunday, April 17, 2011

Gettin' Sketchy with it...

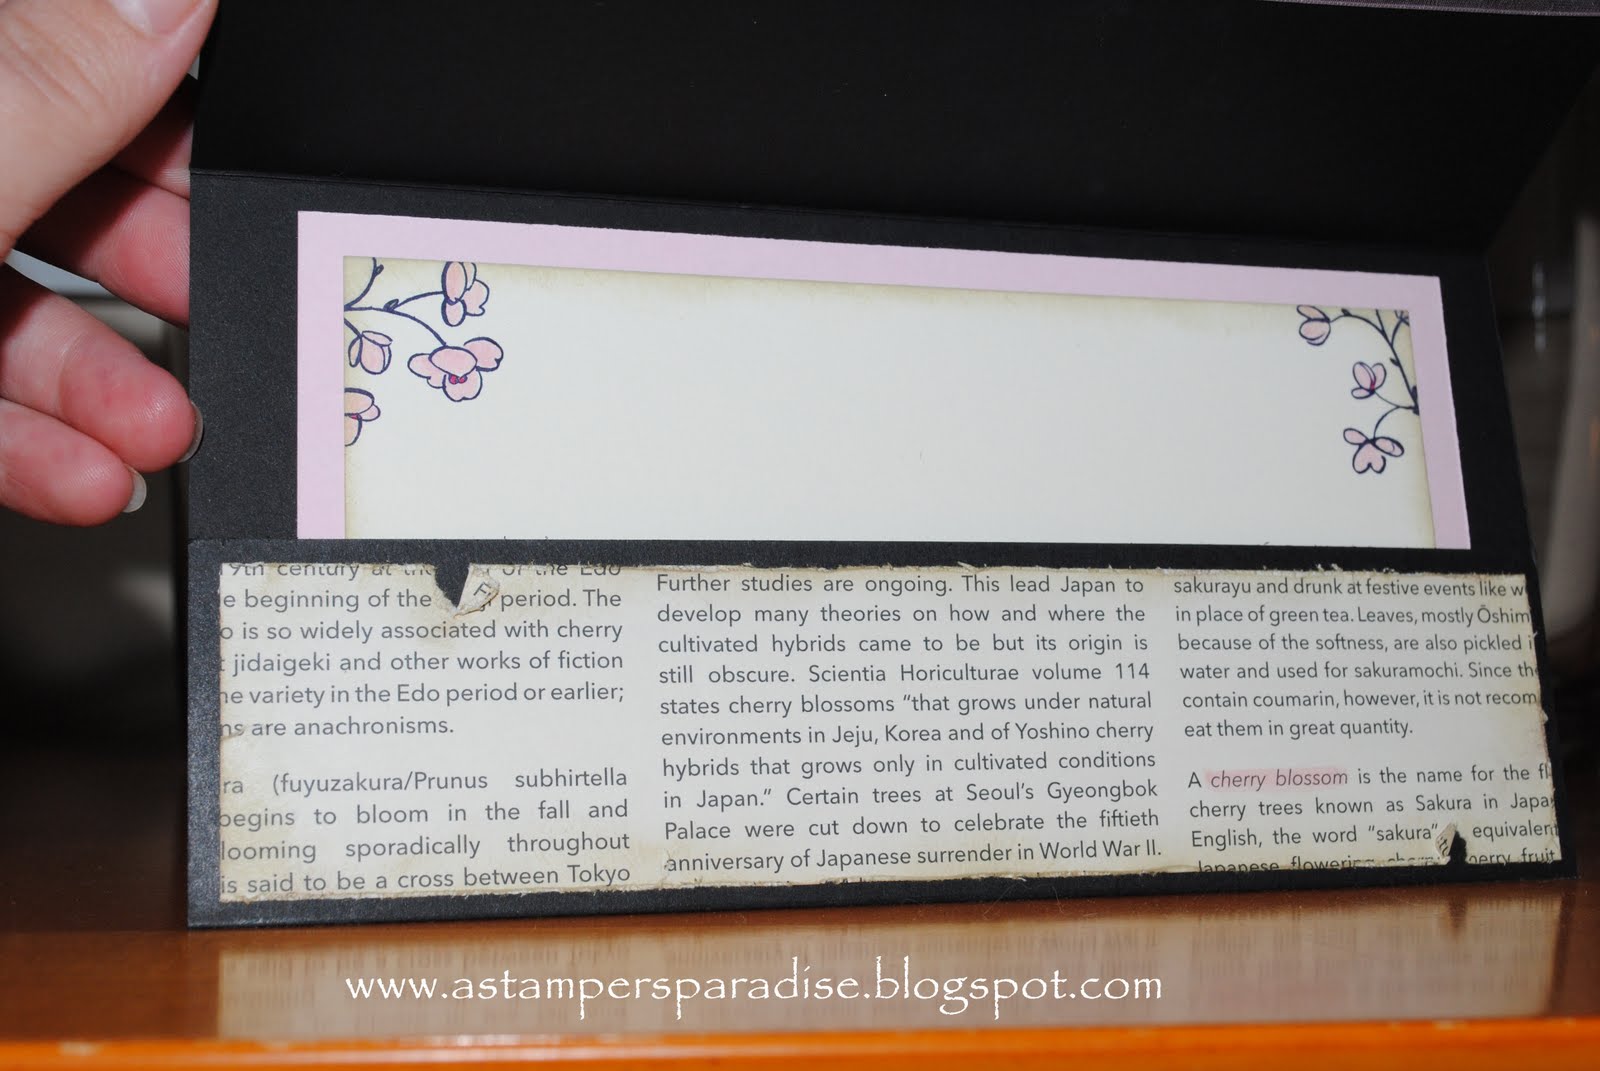
 I have been making this size card for a while now, and it's probably my favorite size! They are perfect to hold money, gift certificates and notes folded up inside. It measures 4"x8" and has a 2" pocket inside. I start with an 8" x 10" sheet of cardstock and score the long side at 2" and 6". This gives you three sections, and the short one gets glued in the corners to make the pocket. So easy! I used Early Edition DSP by SU as the background paper on this card. I LOVE this paper! This particular sheet happens to be an encyclopedia type page all about Cherry Blossoms, facts and info about them, what they represent, where they grow, etc. It was so fitting for the image! The black 1/2 pearls in the bottom right corner are SU Basic Pearls colored a few times with a Black Sharpie. I never need more than one coat for other colors, but black is really purple, so it takes a few times to get it dark. I LOVE coloring on both the Pearls and the Rhinestones! The shape in the left is a Labels Die from Nestabilities. It's cut, then embossing and sponged in the center, leaving the outside ridge uninked. Love it!
 Here's a shot of the inside. I added a pull out message card inside the pocket and stamped the corners to match. Another strip of DSP finishes off the inside. This worn look is just small tears in the paper (and roughing up all edges), and folding them a little, then sponging them heavily with River Rock ink.
This is the sketch I designed for a fun group I swap with. I design these monthly for the group, and still enjoy it very much. I thought for a while that blog design would be my new addiction, but nope, it's sketches! I do all my sketches exclusively in My Digital Studio.

***Most supplies are SU!***

Stamp: Embrace Life
Paper: Basic Black, Pink Pirouette, Very Vanilla & First Edition DSP
Ink: Basic Black, River Rock, Pink Pirouette, Rose Red


Sunday, April 10, 2011

A fancy little flourish card...

This weekend I have really been getting caught up on the crafting 'To Do List'. This is one of the cards I made last night. It's for a special friend, and I mail it tomorrow, so I hope she doesn't see this before then;) We have had a lot going on in my little family lately, and I haven't been taking any time for myself. It feels really nice to devote some time to doing what I love...stamping and sharing it with all of you! Here's a little about this card.

The base is Certainly Celery. I haven't used this color in a while, and I forgot how much I like it! When it's paired with other colors, it tends to get 'lost' since it is so subtle. However, on its' own against neutrals...it's beautiful! I'll definitely be reaching for it more often! The background is Whisper White run through the Big Shot with the Vintage Wallpaper Textures Embossing Folder, then brayed over the raised portions with Early Expresso ink. The Certainly Celery ribbon goes around that and over the smaller Certainly Celery layer. And that beautiful flourish stamp is called 'Fine Flourish' and I got it FREE by spending so much during SAB this year....shhhhh! I had never really noticed it before. Now that I have it...WOW! It's inexpensive and it's gorgeous! The green stone in the center is one of our Basic Rhinestones colored with a green Sharpie before putting it on the card. That's it...Voila!

I just love when such a simple card comes together like this! I hope the special friend I made it for will love it!

Until next time....Happy Stampin'!

Monday, April 4, 2011

BuStEd!!!

I have been called out by a great friend for letting my blog get so far behind....OUCH! She was RIGHT! So...you aren't getting my usual picture quality and I haven't had time to edit the pics or watermark them...but here they are!!! I really HAVE been stamping...just not updating my poor blog regularly...LOL! Below is a card I designed for my club last month. The tulip is made with the Owl Punch, and some ovals. Isn't it great?
 And here's a really simple one I threw together for a swap! Super quick!
 Here's another swappie! I used the Inlaid Embossing technique for the striped background. The lantern is made by running a circle through the crimper...you know the tool collecting dust that you haven't thought about it eons! Pull it out! These lanterns are so much fun!
So...(ahem...KELLI) I have been stamping;) I am REALLY behind on my online life, but for once my real life is just about in order. LOL! I will be back regularly....promise (the pinky kind).

Till next time....Happy Stampin'

Sunday, February 27, 2011

A Blast-y Sketch!

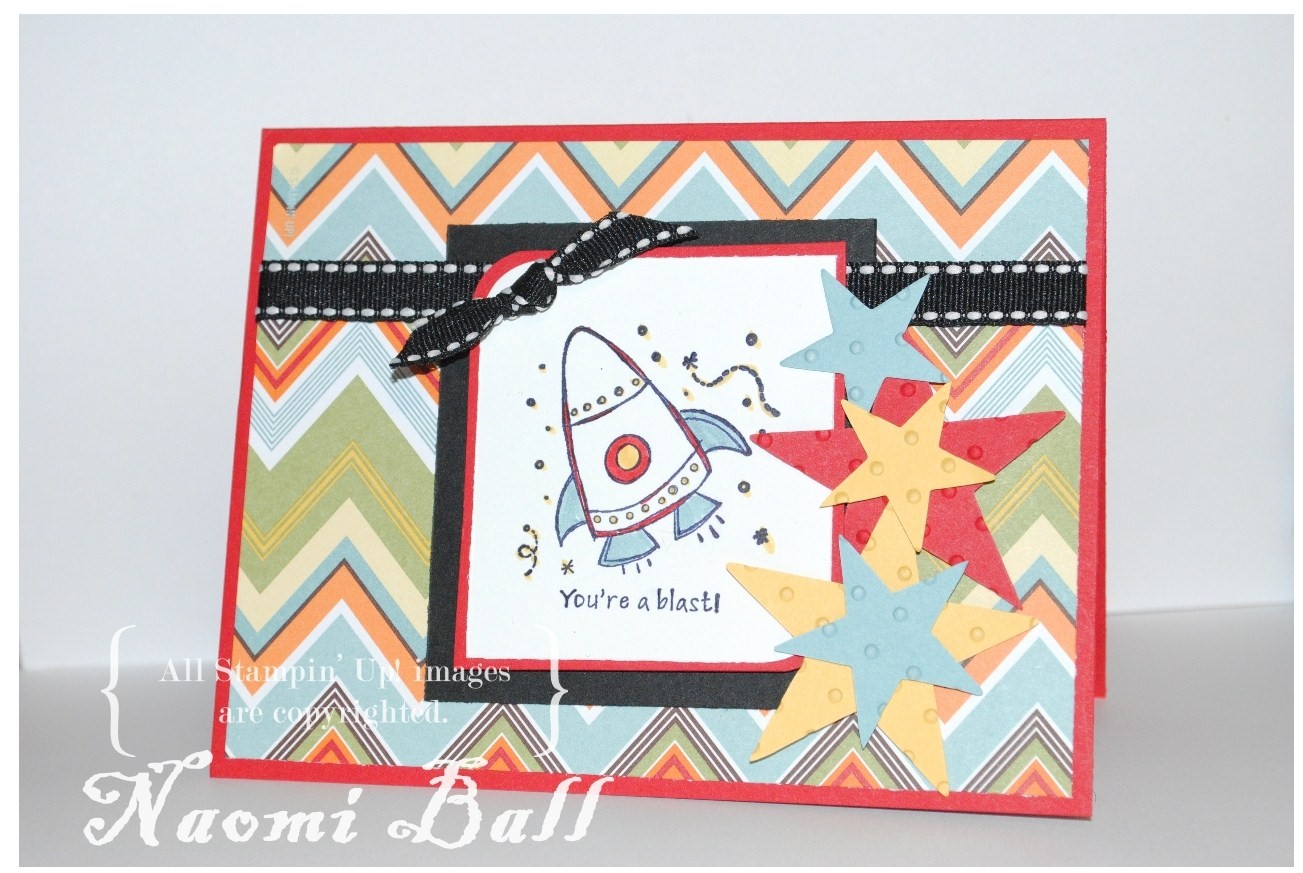
 Here's a card I made for a sketch challenge. It's for a swap group, and I do the sketch designs for the group. When I designed the sketch, I had a flowery card in mind. Needless to say, when I sat down with the sketch, I ended up with something completely different! I really like this fun, bright card! It would make a GREAT birthday card for a little boy (or a grown-up boy;). I hope you guys like it, too. All supplies are SU (except the ribbon, no clue who makes it). I will do a supply list at the end of the post. Below is the sketch, and I would love to have you use it!
Paper: Greenhouse Gala DSP, Real Red, Basic Black, Whisper White Cardstock
Ink: Basic Black Stampin' Pad, Real Red, Daffodil Delight, Baja Breeze Stampin' Write Markers
Stamps: Pun Fun
Accessories: Corner Rounder Punch, Big Shot, Stars Die, Dot Impressions Folder, Dimensionals, Ribbon

Sketch is designed in My Digital Studio

Thursday, January 20, 2011

I ♥ YOU Valentine!

Here is a No-Stamping Valentine's card I made for a swap consisting of super talented SU Demos! It's not often that I create a card without ever inking a stamp, so this is kind of a big deal;) The clouds, balloon and sentiment are rub-ons called Love Impressions. They are AWESOME! The DSP is the Whisper White pattern (with light gray words) from the Neutrals DSP Stack. All around the DSP, curving with the pink circle, I used a Mat Pack and Paper Piercer to pierce the edges. I work quicker without the guide, so I pierce free hand, using a ruler to keep me in line, but not for spacing. This only took a few seconds. If you're scared of a mistake, I suggest the Guide that comes with the Mat Pack. I use it for brad placement, and when I need a strip of exactly spaced pierces. I lived on the edge for this one;)

Supplies:
Paper, Basic Gray, Whisper White, Real Red cardstock. Pink Pirouette Textured CS, Neutrals DSP, Red Glimmer Paper
Ink: NONE
Punches: Small Heart, Eyelet Border, Modern Label
Accessories: Love Impressions Rub-Ons, Mat Pack, Paper Piercer, 1/4" Real Red Grosgrain Ribbon, SNAIL, Dimensionals

Hope you like it and will visit soon for more!

Thursday, January 13, 2011

Two Sketches...

Above is my December Sketch and the card I made from it. All of my sketches are done in MDS, and I really enjoy designing them! I create them as a monthly challenge for a Yahoo Group I play and swap with. The card I made turned out very masculine, and had I not had to send it to my partner, my hubby would have gotten it for his birthday a couple days ago;) I will be blogging his really cool card tomorrow. I am not listing supplies for this post. Most are SU, but the pattern paper and texture green in this one is not, it's American Crafts and DCWV.
  And here is my January Sketch and the card I created using it as my guide. Bella Rose remaines my favorite DSP, and as much as I want to hoard it and never let it go, I LOVE using it on cards. The coral/green textured CS is DCWV, everything else is SU. I have resolved this year to use up or give away the stuff I don't use, so I am trying to at least use up some of the papers.

I hope you like these cards! I will be back tomorrow with my hubbys birthday card with a cool technique I stumbled upon on my own, though it's really to simple to call it a technique;) Till next time...Happy Stampin'!
                                     

Digi Snowman - Winter Wishes

Here is a fun card I made for a Winter Snowman swap. It's not a Christmas card, and that is usually all I make for winter, so this was a lot of fun. I didn't feel like using any of my snowmen stamps, and was in the mood for Punch Art;) However, my craft area was so messy (couldn't be...LOL!) that I didn't want to clean it up just to make a huge mess, which is what always happens when I get punchy! So...I sat down in my pj's (the only way to craft) and pulled up My Digital Studio. Punch Art in MDS is much tougher than IRL, but I finally was pleased with it! His body is circle punches, his arms are from a bird stamp set, they are bird legs. His buttons are brads, and his nose is a heart stretched out long and thin. His hat is an upside down birthday present stamp. So, this is completely digital, no stamping at all. I trimmed the cardfront and attached to Night of Navy cardstock, and created the inside piece to match. What is so cool is that I now have this project saved in MDS and can print it anytime! Whoohooo!

Sunday, January 2, 2011

Love You Much

First of all...LOVING my brand new Nikon D3000 from the wonderful hubby for Christmas. I have a LONG way to go to really learn to use this camera, but I actually took this shot with all manual settings, so I am learning, slowly but surely.

I am a member of an awesome SU Demo group for demos who live in the great state of North Carolina, and we do lots of swaps. For the month of January, I get to send one card every Monday to a fellow demo. It's called Monday Mailers, and it's a lot of fun. The theme for this month is Valentines, red and pink. So, I am trying to keep the theme while using some traditional and some non-traditional stamps for this theme. This one is non-traditional, in that I didn't use hearts, etc. The deets are below, I hope you like it, it was a lot of fun to make, and I hope Martinette will love it!

Stamps: Friends 24-7, Well-Scripted
Paper: Naturals White, Riding Hood Red, Pink Pirouette
Ink: Riding Hood Red, Pink Pirouette
Wide Oval Punch, Dotted Scallop Ribbon Border Punch, Vintage Wallpaper Texture Folder, Big Shot
Basic Pearls, Dimensionals, Tombow Multi, SNAIL

Saturday, October 23, 2010

A quick and easy one here...

I made this card for a fellow SU Demo here in NC that I am swapping with all Fall. We send each other one card per week, well, she does;) I stay a week behind and end up sending her two at a time. I am trying to do better! She didn't like this embossing folder, Elegant Lines, and I found that so surprising since it is one of my favorites. So, I have been bombarding her with samples and pictures using this folder. She likes it now...Mission Accomplished...LOL! She and I have never met, but have so much in common! I hope she likes this card. It's simple and clean, but I think it kind of pops regardless! It's super easy to duplicate, so if you like it, feel free to CASE!

Supplies:
Stamps: Whimsical Words (SAB 2009 - retired)
Paper: Whisper White, Crumb Cake, Rich Razzleberry CS
Ink: Rich Razzleberry Classic Stampin' Pad
Tools: Wide Oval Punch, Scallop Edge Punch, Big Shot for SU!, Elegant Lines Embossing Folder
Accessories: Rich Razzleberry Satin Ribbon, Dimensionals, SU Anywhere Glue Stick (I had run out of SNAIL...that will never happen again, though our Glue Sticks are phenomenal!)

Tuesday, October 19, 2010

A Sketchy Christmas...

 I have been a little behind in updating my blog. Sorry guys! I have been stamping like crazy, so I do have lots to post now;) Here's a Christmas card I made last week. I am trying to use up a lot of my retired papers, so this card uses Ski Slope DSP, which is retired, but my favorite ever Christmas paper. I also use a retired stamp set, Scandinavian Season, which I really love! The corners, and tree have a red gemstone that didn't show up well in the picture.

And below is the sketch I designed for one of my online groups to use for an October Challenge. I flipped the sketch on it's side for this card. It's such a clean and easy sketch, you could do so much with it. Feel free to play with it!
Supplies:
Paper: Old Olive, Real Red, Chocolate Chip cardstock - Ski Slope DSP
Ink: Old Olive
Punches: Corner Rounder, Photo Corner, Scallop Edge
Accessories: Red gems (Hero Arts), Clear gems
Sketch Designed in MDS

Thursday, October 7, 2010

My Dear Friend...Fall

While browsing a SU Demo forum I ran across a gorgeous card by my fellow SU Demo, Karen Leveille. I changed a few things, but it's very obviously a CASE of her card. I usually almost never CASE, but her card really caught my eye this morning! I made this in minutes, it was really easy! Making your own background paper is quick, fun, and made to match exactly what you need! I just randomly stamped leaves and acorns from SU's Autumn Harvest. Added a nice sentiment, created a gorgeous bow, and made a little leaf tag. I did do some paper piercing along the bottom of the green layer, which adds a little interest. We are in the midst of my favorite season, and it's hard for me not to create Fall projects right now! Supplies are all SU, and listed below. Thanks so much for visiting me!

Cardstock: Whisper White, Old Olive, Early Expresso
Ink: Old Olive, Pumpkin Pie, Early Expresso
Stamps: All Holidays, Autumn Leaves
Punches/Tools: 1 1/4" Circle Punch, 1 3/8" Circle Punch, 1/16" handheld, Ticket Corner Punch, Mat Pack, Paper Piercer
Accessories: Old Olive brad, crochet thread, 5/8" Early Expresso Grosgrain, Dimensionals, Sticky Strip
                   

Monday, September 20, 2010

Cherry Mist Christmas...

                         
Here's a Christmas card I made last night, actually I made two of them. For swaps, I am finding it's so much quicker to make 2 of the same card at once. I really ended up liking this one, even though it's very different from what I usually make. I started by running a piece of Whisper White CS through the Big Shot with the Pretty Petals Embossing folder. I then inked up my brayer with Cherry Cobbler ink, and covered the raised images with ink. I LOVE this simple but effective technique. You get the raised texture and color. If you have never tried it, you really should pull out your brayer and give it a go!

Thanks for stopping by!

Paper: Whisper White, Marina Mist, Cherry Cobbler CS
Ink: Cherry Cobbler, Silver Shimmer Paint
Punches: Dotted Scallop Ribbon Border, Eyelet Border, Ornament
Accessories: Big Shot, Pretty Petals folder, Marina Mist ribbon, Daubers, Filigree Brad, Brayer, Glue Dots, SNAIL, Dimensionals 

Friday, September 17, 2010

Christmas Doors...

These were so much fun to make, and super easy to do more than one at a time! I sponged around the edge of the card to give the door some depth, and the edges of the door sections are heavily sponged on the edges to they look like they are actually raised. The doorknob is a Silver Brad, but it looked way to plain on the card by itself. So, I punched a Modern Label piece, and stuck it back in the punch to make it tiny. I think it's a great shape for this, and I have never seen it done, so it's a truly original idea, which are hard to come by these days! Doesn't mean noone else has ever thought of it, just that I have never seen it, so it's original to me. If you have this punch, give it a try!!! The wreaths are made from circle punches (1 inch circle, overpunched with 1 3/8 circle to make a ring), then the tiny scallop from Itty Bitty Punch Pack was punched a lot and layered on the ring with Tombow Multi. The bow is a SU Sizzlit, it's the Beary Girl Accessories from the Build A Bear line! Both of these had to be sent out for swaps, but I will be making MANY more of these. I think a saying for the inside would be 'From Our Front Door To Yours, We Wish You A Merry Christmas', or something along those lines! Hope you like it, and as always, on to the supply list!
*
Sahara Sand Ink/CS, Real Red & Garden Green CS
PUNCHES...Modern Label, 1" & 1 3/8" Circle, Itty Bitty Punch Pack, Curly Label
Beary Girl Accessories Sizzlet
Dimensionals, Tombow Multi, SNAIL
SUO!

Monday, September 13, 2010

A card I made for my own sketch...

Here's a card I made this week for a sketch that I designed for an online swap group. I used some retired DSP called Bella Rose, which is still my favorite paper EVER! I used the set Just Believe as well as Well Scripted for the sentiment. This card is a mix of current and retired product, but everything is SU! This card could easily be recreated using current product only! I used Perfect Dots for the embossing folder, Top Note Die for the image, and also used the Wide Oval punch with two brown ovals behind it to frame it. This was a simple card, but I just love the result. Below is the sketch I designed. Feel free to use it in your creations, too! Thanks for stopping by!


Tuesday, September 7, 2010

Pink and Brown Christmas...

Hello, everyone! I am so glad you stopped by for a minute! Here's a Christmas card I made last night, I actually made this card twice, for two swaps. I LOVE the Greeting Card Kids stamp set, and have been itching to make a Christmas card with this adorable little girl. Notice instead of doing a detailed coloring, I only added a tiny bit of color to the image. I hoped to achieve an aged image look, so the coloring it barely there. I WISH my camera had cooperated! Batteries died and I did not have time to get new ones, these had to mail out this morning. The image is sprayed once close and once far with the new Vanilla Smooch Spritz from SU! It gives a sheen to the image, and the closer spray provided some small 'glops' of shine with look like falling snow when the light hits it! I wish I had gotten a chance to get a better picture. I really like the old, feminine feeling from this card, and such a different color scheme that traditional Christmas!

Supplies : SU only
Paper - Textured Pink Pirouette, Early Expresso, Whisper White
Stamps - All Holidays, Greeting Card Kids
Ink - Pink Pirouette, Early Expresso, Old Olive
Punches/Dies - Corner and Border Scallop Trim Punches, Rectangle Clearlit, CropODile
Accessories - Dimensionals (about 12 on this card), Chantilly Lace Trim, Blender Pens

Friday, September 3, 2010

Patterned Owl...


Well, so far, I have been making solid color owls with the new Owl Punch from SU! However, I just got in my new Greenhouse Gala DSP and decided the owl would look great patterned. Definitely not your everyday barn owl:) This card was made for 2 Fall swaps. One was for SU Demos in NC, so I could only use current SU product. So that card was minus the button and ribbon, which are both retired. This card is for another swap group. I loved making this! Hope you don't mind looking at it =)
*
Supplies are all SU!
Baja Breeze Textured CS, Pumpkin Pie, Chocolate Chip, Old Olive CS, Greenhouse Gala DSP
NO stamps, NO ink (that's a big deal for me!)
Big Shot and dies: Scallop Circles #2, Little Leaves, Perfect Dots Embossing Folder
2-Step Owl Punch
Chocolate Chip Grosgrain Ribbon, Baja Breeze Corduroy buttons, Dimensionals