Welcome to A Stampers Paradise!

You've stumbled upon my escape from the daily grind! I hope you enjoy what you see here. I am a SU Demo who loves trying new techniques, holding card making classes, creating techniques of my own, and most recently blog design, I love anything stamping related! I hope you'll stay a minute and come again! I'd love to know you were here, so feel free to leave comments!

Showing posts with label Feminine. Show all posts

Sunday, April 17, 2011

Gettin' Sketchy with it...

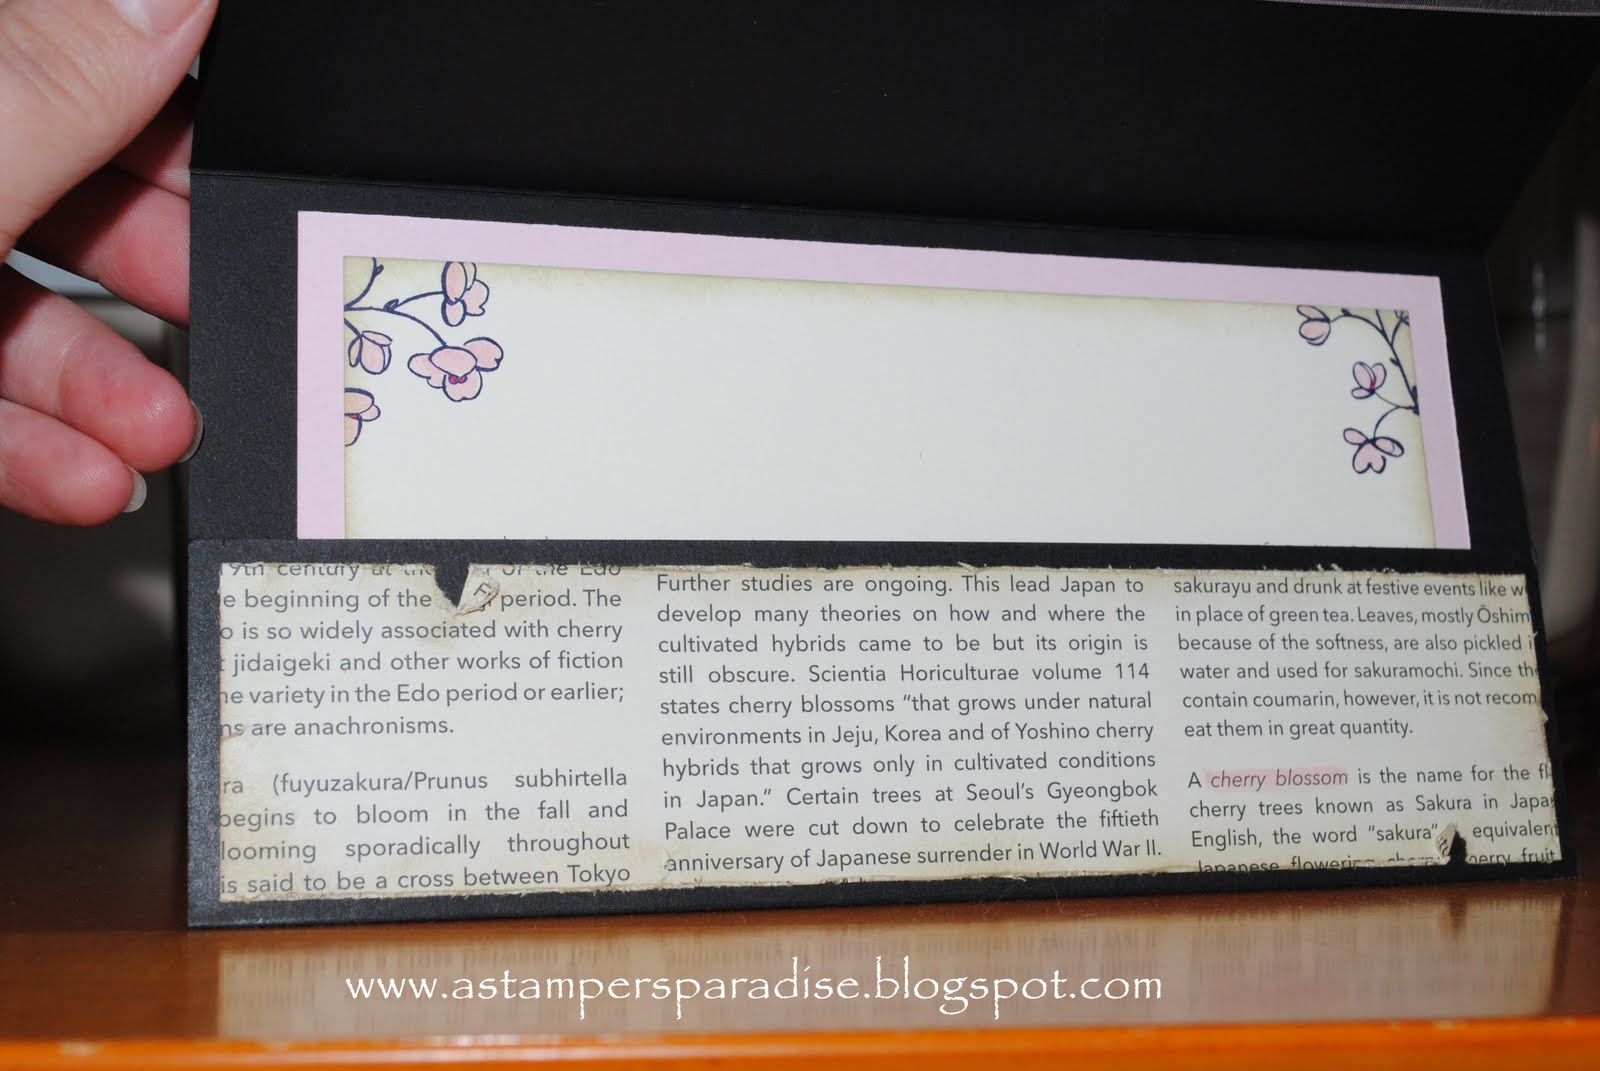
 I have been making this size card for a while now, and it's probably my favorite size! They are perfect to hold money, gift certificates and notes folded up inside. It measures 4"x8" and has a 2" pocket inside. I start with an 8" x 10" sheet of cardstock and score the long side at 2" and 6". This gives you three sections, and the short one gets glued in the corners to make the pocket. So easy! I used Early Edition DSP by SU as the background paper on this card. I LOVE this paper! This particular sheet happens to be an encyclopedia type page all about Cherry Blossoms, facts and info about them, what they represent, where they grow, etc. It was so fitting for the image! The black 1/2 pearls in the bottom right corner are SU Basic Pearls colored a few times with a Black Sharpie. I never need more than one coat for other colors, but black is really purple, so it takes a few times to get it dark. I LOVE coloring on both the Pearls and the Rhinestones! The shape in the left is a Labels Die from Nestabilities. It's cut, then embossing and sponged in the center, leaving the outside ridge uninked. Love it!
 Here's a shot of the inside. I added a pull out message card inside the pocket and stamped the corners to match. Another strip of DSP finishes off the inside. This worn look is just small tears in the paper (and roughing up all edges), and folding them a little, then sponging them heavily with River Rock ink.
This is the sketch I designed for a fun group I swap with. I design these monthly for the group, and still enjoy it very much. I thought for a while that blog design would be my new addiction, but nope, it's sketches! I do all my sketches exclusively in My Digital Studio.

***Most supplies are SU!***

Stamp: Embrace Life
Paper: Basic Black, Pink Pirouette, Very Vanilla & First Edition DSP
Ink: Basic Black, River Rock, Pink Pirouette, Rose Red


Tuesday, September 7, 2010

Pink and Brown Christmas...

Hello, everyone! I am so glad you stopped by for a minute! Here's a Christmas card I made last night, I actually made this card twice, for two swaps. I LOVE the Greeting Card Kids stamp set, and have been itching to make a Christmas card with this adorable little girl. Notice instead of doing a detailed coloring, I only added a tiny bit of color to the image. I hoped to achieve an aged image look, so the coloring it barely there. I WISH my camera had cooperated! Batteries died and I did not have time to get new ones, these had to mail out this morning. The image is sprayed once close and once far with the new Vanilla Smooch Spritz from SU! It gives a sheen to the image, and the closer spray provided some small 'glops' of shine with look like falling snow when the light hits it! I wish I had gotten a chance to get a better picture. I really like the old, feminine feeling from this card, and such a different color scheme that traditional Christmas!

Supplies : SU only
Paper - Textured Pink Pirouette, Early Expresso, Whisper White
Stamps - All Holidays, Greeting Card Kids
Ink - Pink Pirouette, Early Expresso, Old Olive
Punches/Dies - Corner and Border Scallop Trim Punches, Rectangle Clearlit, CropODile
Accessories - Dimensionals (about 12 on this card), Chantilly Lace Trim, Blender Pens

Saturday, July 17, 2010

Pink and Brown are made for each other!

We all know pink and brown are beautiful together! Yes? Ok! It's true, there's just not too many other two color combos that can evoke such a feminine air, yet also lend themselves to vintage, shabby chic, and more! They are amazing! Like peas and carrots...LOL! However, until this month, the darkest brown we SU'ers had the option of was Chocolate Chip, and our lightest pink was Pretty in Pink. Now, those two are nice together, and I still love Chocolate Chip, just not as much as I used to:) Early Expresso is so rich, and much darker. I couldn't believe how amazing it looked with Pink Pirouette (a former In Color joining the SU family!). It's so decadent! I paired these colors with a Crumb Cake (formerly Kraft) base, and Very Vanilla for my neutral paper. I also used Very Vanilla HodgePodge Hardware, and ribbon.
*
This is the new hostess set, Because I Care, which I have posted here before, and find myself reaching for often! This set is definitely a keeper! I stamped the image on the cardstock and also on copy paper. I trimmed closely around the flower on the copy paper and use the negative to layer over the flower, leaving the flower portion open and protecting the rest of the paper. Then I used daubers and Pink Pirouette ink to lightly color in the flower. I also stamped the small bloom image lightly all around the sentiment to add a little depth under the hardware frame.
*
I designed this one last night for my club meeting today. I know...I was behind, our house has been ruined from floor damage...it's done now, but ate a whole month of our lives! I will post pics of the completed floors another day, after I have time to sweep:) All the ladies really seemed to like this card. I now have a new favorite pink/brown combo, and a sneaking suspicion I will use it often.
*
Thanks for visiting!

Thursday, June 24, 2010

Because I Care....

This is a brand new set coming in the 2010-2011 IBC from SU! It's a Level 1 Hostess set called 'Because I Care'. I LOVE it! Here, I used an Always Artichoke base, Elegant Eggplant for the layer, and the stamped image is on Whisper White. Scallop Trim Border and Corner add a nice touch, and make it look like more than the quick card it really is. I used SU markers to color the stamped image and sentiment. I stamped the envelope to match to use it for a 'Card with Matching Envie' swap I had to send out this week. I got really attached to this one, almost kept it and made another for the swap:) Check out the next pic to see the top view....
One of the things I love most about this new set, aside from the fact that it is beautiful, is there is a single bloom image that you can stamp several times, trim and pop up on little pieces of Dimensionals. This really gives the flowers a realistic look! You can see I also matted and scalloped the edges of the inside matting. I also stamped a matching flower image lightly by stamping off once first.
I am smitten with this new Hostess Set. The new catalog is SO GREAT! I will definitely be using a lot of new goodies in the very near future. I am a little behind on posting on my blog as well as cruising my Blog Groups. Hang with me everyone. I will be catching up some tonight, some tomorrow. We had a water leak in our freezer, and our hardwood floors are ruined in the kitchen and breakfast nook. The floors in those two rooms and the dining room will have to be cut up, not all of it, just a big portion. New floor has to be laid, all 3 rooms, plus the foyer sanded, stained and resealed with all new moldings installed. We have had LOUD, HUGE drying equipment in the kitchen for over a week. It was 100 degrees here in NC today, and our house would not cool lower than 87!!! The drying equipment shoots out HOT air, and our AC hasn't shut off in a week, not once! So, on the home front, things have gotten hectic and I had to set crafting aside for the last week. I am glad to be back, and hopefully will have a good report on my floors soon! A little more drying, and they are ready to be replaced!

Tuesday, January 12, 2010

Beautiful Wings...

This was a really quick card, it took 5 minutes or less to throw together! I simply folded some Kraft cardstock, and glued a black layer in the center. Then I ran some of the In Colors through my Big Shot with the NEW Beautiful Wings Embosslit and stick those on some Whisper White cardstock. I added a loop of matching In Color, Polka Dot ribbon behind the coordinating butterfly and stuck that layer over the black with Dimensionals. Stamped (friend to friend) in Basic Black and pierced the corners using the Mat Pack and a Paper Piercer.

CS -- Kraft, Whisper White, Basic Black, Rich Razzleberry, Melon Mambo, Bermuda Bay.
Ink -- Basic Black
Stamps -- Teeny Tiny Wishes
Accessories -- Big Shot, Embosslit, Ribbon, Mat Pack/Piercer

This card (like most) are SUO. Sorry about the dark pic, I tend to remember to take pics at night, when lighting is horrible. As part of my New Years Resolution, I will work on that!

See you all soon! Happy Stampin'!

Monday, August 17, 2009

Bella Rose Tri-Fold Shutter...

Well, I gave this Tri-Fold Shutter card another try. This one still took a while, but not as long as my Christmas one I posted earlier. I like this one a lot! This card is so thick that I cannot get a picture of it closed without me holding it together, so please pardon my hand in the pic below.
My Big Shot really got a workout on this card! I used several dies on here, SU Little Leaves, SU Birds & Blooms, SU Top Note Die, Architectural Elements. The only stamp set used is Friends 24-7 and the word WISH from Small Script. DSP is Bella Rose, Cardstock is Riding Hood Red, Pink Pirouette (textured), Kiwi Kiss (textured), a touch of Chocolate Chip and Whisper White. All buttons are SU from Button Bouquet (retired), flowers are Kaiser and unknown. Pearl is Mark Richards, and red crystal is from Hero Arts.
I need to buy a Scor-Pal, then this fold would be easier. Hope you like this one!

Friday, July 24, 2009

Fabulous Friend Flower Pot

So, I sat down last night determined to get some much needed stamp time in. I began by making my coffee, and straightening my craft area just enough to have room to work. Then my craft light fell off of it's stand, crashed into my coffee cup, which poured everywhere! It soaked through 2 brand new packs of cardstock that I just got in, and was getting ready to file, ruining almost every piece! I was livid, yelling at the coffee cup, trying to kill the lamp, and screaming for Jim to bring me some paper towels. You would have thought it was a 'real' emergency with how angry I was! So, that's how my night of stamping began. However, it ended on a much better note. I finally made the Flower Pot card, which is currently a featured tutorial on SCS. I may never make another one, but I love this one! It took me well over an hour, and after all my ruined paper, I was just not feeling it anymore. Maybe if I tried again, I could pull one together much quicker. Below is a shot of the insert pulled out.
Paper: Melon Mambo CS, Razzleberry Lemonade DSP, and Rich Razzleberry CS
Stamps: Flight of the Butterfly, Oval All, and The More the Merrier (new Level 3 Hostess)
Punches: 5-Petal Flower, Scalloped Oval, 1" Circle, Boho Blossom, Eyelet Border, Large Oval
Die Cuts: Big Shot by Sizzix for SU, Little Leaves SU die, Birds&Blooms SU die
Accessories: Sq Fire Rhinestone Brad, Melon Mambo Ribbon, Frosted Lace Stickles, Sponges

Thursday, May 7, 2009

I made 20 Mother's Day cards this year...

And here are a few of my favorites. This year I decided to make a point to send Mother's Day cards to the important moms in my life. I really wanted them to all know how special I think they are! I am happy with how they turned out. Only the card on the top left was made more than one of, all the other 20 cards were original, with no two alike. I did these in 2 nights!!!

After deciding that I must get some DSP out of my stash, I realized I had barely touched the SAB paper from this year. So, it's not pink and girly, but I LOVE the combos on these cards. I allowed myself ONLY this DSP, Bashful Blue, Certainly Celery, So Saffron, and Kraft cardstock. The only stamp set I allowed myself to use is the SAB set, Polka Dot punches. I used the ribbon bundle from SAB (opened it when making these, it hadn't even been touched, I am a hoarder), and only allowed myself Whisper White grosgrain besides the bundle. Styled Silver HPH is the only embellishment I used, besides epoxy bubble stickers that I uncovered that must be 2 years old and never opened! Here are some close-ups of my faves....


Don't know why I love this one (above), it's simple. I scalloped down the open edge, lined the inside with a strip of DSP, and stapled the ribbon on. The circles are on Dimensionals atop Kraft circles. Small epoxy stickers are in the center to spotlight the center of the flowers.
And this one is for my sister (above), there is one other like it, just a different brad, I forgot about that earlier. This is a quilted Top Note with the Big Shot. Horizontal Slot Punch used for my ribbon holes. 5-Petal Flower punch made the flower in the bottom corner.

And this one for some reason is my absolute favorite!!! It's a simple concept, one I have never done. I lined the bottom of my card with the blue pattern in the DSP. Used the stripes with the Scallop Edge punch and adhered just above. Took my So Saffron Grosgrain (this is the most yummy ribbon EVER!), and pleated and sewed as I went down the card. I punched various size circles from scrap DSP and decorated the top portion. A couple are on Dimensionals to stand up a little, and the middle yellow piece is covered with a clear epoxy bubble sticker to shine and look nice. A very special friend is getting this one, and it was made with her in mind. I hope she loves it!
So, this year, more than ever, I hope the women in my life who are mother's know how much I love and appreciate them. We often don't hear how great of a job we are doing, and that's a shame! Motherhood is the best thing to ever happen to me, but it's also the hardest job I have ever had. I know other's feel the same way! So, to my 'invisible' friends who I couldn't add to my list or I would have been stamping forever, I want to wish you all a Happy Mother's Day, too!!!

Monday, March 9, 2009

Faux Silk Card


This is the technique I taught my club this month. Everyone seemed to have a good time with it, which makes me happy as it's one of my favorite techniques. I also don't use blue nearly enough and end up with tons of paper I never use, so I am trying to make myself use it. I don't know why I don't like blue, it's just not my thing. However, I must say, I like it on this one. Base is Brocade Blue, over that is Very Vanilla run through the Big Shot with a SU Texturz Plate. The other BB layer is torn down the side, pierced and stitched. Then we have So Saffron layering under the image. The image is stamped on tissue paper, colored lightly, balled up then gently opened up, then glued with a SU Glue Stick to Very Vanilla CS. I love the look. Image and sentiment are from the new SU set, Friends 24/7. Another fairly easy one, that I was really happy with.

Friday, February 27, 2009

Purse Punch Card...


This was actually made in Nov 08 for my sister, and I never put it on my blog. I just saw a blogging friend who put one of hers up and it reminded me of the one I made a while back. I kept the purses simple using the Tag Punch, and the handles are made with bronze paper punched with large and small tag and circle punches, the buttons are just scrap holes punched out of the same paper with the hole punch. My sister is a purse NUT, and she loved this card! It is extremely simple, but it made her smile!

Thursday, January 29, 2009

Swirly, Whirly Bird


This card was inspired by the sketch I found on a friends blog, HERE. I used the basic layout, then seemed to forget about my goal, and for once I am glad my brain sidetracked, I LOVE how this card turned out. I will list colors and everything below. I always see people with sketch challenges and wish I could do them, I just have a hard time sticking to it, I will start, then it turns into something else. However, on this card, I think you can still see the layout inspiration.
SU Cardstock in Mellow Moss, Perfect Plum, and Pale Plum.
Pattern Paper is from ProvoCraft, a Bitty Scrap Pad called Soft Serenity.
Ovals are cut using CM cutting system.
Punch down side is SU Scallop Edge, green is pierced at edge.
Ribbon is a Hot Spot thing from Archivers, part of my stash I am working to eliminate.
Pearls are Crystal Stickers (pearl) from Mark Richards.
Bird and leaves are SU Sizzlet dies called Birds & Blooms.
Paper flower is Kaiser Scrapbooks.
Every layer went through the Big Shot in a CB folder called Birds & Leaves.
Happy Birthday is from It's Your Birthday from SU.
Button is just from my stash again, no idea where it's from, probably old clothes!
PS---Note that on every layer, the CB image lines up, I was that anal about this card...LOL!!!

Sunday, December 21, 2008

Big Shot Bird...


This is the first card I made with my new Big Shot. It's simple, which I think may be my new style as I have been doing it for a couple of weeks now. The base of this card is Really Rust CS, the side panel is Old Olive. The Old Olive was run through the Big Shot with a Fiskars texture plate {I was excited to discover this works!), the edges torn and inked with OO ink. The image is from Serene Spring, a SU current Level 2 Hostess Set. I ran Watercolor Paper through the Big Shot with Sizzix Scallop Circle #2 die to get the scallop. Then I stamped the bird image onto the paper with Timber Brown StazOn ink. I watercolored it using Earth Elements WaterColor Crayons, and Aquapainters. The sentiment, also stamped in StazOn because it was already on my desk, is from Love Ya Bunches, a SU set from a few years ago. Lastly, there is a piece of Antique Brass Hodgepodge Hardware on the side holding my ribbon. This is for a friend who is having a rough time, and I hope it will cheer her up and remind her that I love her.

SU products in BOLD print. The StazOn and Sizzix items are from SU also.

*** This is one of my first 'real' attempts at watercoloring with Aquapainters, and I am in love! It is definitely time consuming, I spent about 15 minutes coloring this image, but I love the outcome. It's not as easy as I thought it was, and need more practice, but I think it's good for a first 'real' try.

Thursday, October 23, 2008

Flight of the Butterfly Set


Is there anything more exciting than opening up that fun box that the big brown truck drops off??? I don't think so!!! Got my club order in yesterday, and in it was my newly ordered Flight of the Butterfly set. I had so much fun creating this little set with it. I made a card with matching envie, bookmark and pen. These projects are for a workshop I have scheduled for next week. I hold classes, and run a full club, but have never done a workshop outside of my home. I am nervous that I will leave and forget something vital, or something silly like that! So, planning for this is much different than my clubs, classes, etc. These are non/new stampers. That means I can't turn to my love of techniques, I had to keep this clean and simple, and showcase my favorite SU products. For me that is our punches, our paper, our ink, and our stamp sets. I chose to use only one set. I am hoping possible future stampers will see how much you can acheive with a small selection of supplies. I kept it all the same color to make a little Thank You set for everyone to have on hand. The THANK YOU on the blue strip on the card is from All Holidays, I tried to incorporate the thanks sentiment from FOTB, but it wouldn't fit where I wanted it.

What do you all think about this as a workshop project? Never having planned for something outside of my club, I was unsure how much/little to plan to make, etc. Thanks for any comments on this one!

Supplies...
SU Cardstock in Chocolate Chip, Very Vanilla, Baja Breeze, and Kiwi Kiss.
Ink is Baja Breeze and Kiwi Kiss.
Punches -- Corner Rounder (it's CM,...shhh), Scallop Circle, Round Tab, 1 3/8 Circle, Handheld 1/16 for brads, Handheld rectangle for bookmark ribbon.
Stamps - SU Flight of the Butterfly (small Thank You from All Holidays)
Accessories -- Choc Chip Grosgrain ribbon, Silver brads, Dimensionals, Pentel RSVP Pen (filled with stamped printer paper, it rolls so much easier than CS), oh and a regular office stapler to really hold on that tab on the bookmark, as the ribbon is knotted under there.

Let me know what you think about this one. I think it turned out great, but how is it for a workshop?

Thursday, September 25, 2008

Breezy Vanilla Kisses


This card was made for two Splitcoast Challenges. CC185 Breezy Vanilla Kisses, color challenge using Very Vanilla, Baja Breeze and Kiwi Kiss. Blue is one of my least favorite colors, and I hardly ever use it in my projects, so this was the ultimate challenge for me. The second challenge was SC195 which is a sketch challenge, this week using three large, square layers stacked on the card front. I am not into an overage of layers, so I struggled with that as well. All in all, I like the finished product, and will not even begin to hint at how long it took me to complete. I did however, learn to like Baja Breeze very much!


This is the close-up of the flower detail on the front. A very decorative brad (from Making Memories I believe) complememts the SU Antique Brass HPH, which I am still greiving the retirement of. I used the circle piece to hopefully look like tendrils on plant stems, and the flower is the 5 Petal Punch, the 'leaves' behind it are the Scallop Circle Punch. This was a tough one, I like it, and I hope you do too!

--Also, the picture is slightly darker than the real thing, it's rainy here, so I can't get outside for natural light. I hope the texture, layers, and all the details of this card show up. The kissed BG isn't showing up that I can see, but I hope everything else is clear to you!

Cardstock -- Very Vanilla, Baja Breeze (&BB Textured), Kiwi Kiss (&KK Textured)
Patterened Paper -- Provo Craft...Heritage Post pad
Ink--Baja Breeze, Kiwi Kiss
Stamps-- Fresh Cuts, Canvas BG
Tools--Brayer, 5 Petal Punch, Scallop Circle Punch, Dimensionals, HPH, Decorative brad from Making Memories.
Techniques--Sponging, tearing, layers, kissed BG.
***All supplies are SU! unless otherwise noted.

Enjoy. As always, questions and comments welcome!

Sunday, August 31, 2008

Flowers in the Window

This is a card that I should have had on here a month ago, but I just found it under my scrap paper! This was the swap I did for my hostess club's August swap. I am so in love with this new SU set, it's a Level 3 Hostess Set (free for hostesses!!!), called Window Dressing. Basically it is an adorable window with lots of cute images that can go in the window. Too cute. I stamped the window on Natural White paper, and using a craft knife, cut out the window panes. I then used the NEW Scallop Edge Punch to create curtains and added some DSP scraps to make wallpaper. I watercolored in the top 'fan light' window with a little bit of blue. Came out kind of dark in these pictures. I stamped the 3 flower image that also comes in this set, and cut each of them out (took forever, but was worth it!), then I colored them with SU markers, and used a 2-way Glue Pen to glue them in the window. The 'brick' on the house is SU Real Red cardstock dry embossed with a Fiskars plate. The fence is SU Close to Cocoa CS using the Scallop Edge along the top corner. I scored down each panel (between curves) to create wood slats. Added some wood grain with WWC and blender pens. Stamped, colored and cut out the little bird, who also comes in this set, used a glue dot to set him on the fence. Stamped the HB from It's Your Birthday Set, and threaded through some hemp twine, and tied around the fence. I put the whole card front together then glued it to a So Saffron base. Here is a close up of the flowers in the window...
Well, I need a better camera I think for all this detail stuff, but you get the idea. I hope you like this card! Oh, also, the shutters were scored along the 'hinged parts' and they are folded out so they are not laying flat. Lots of dimension on this one! Enjoy... It's a rainy day here AGAIN, so a card that's cheerful should make us all feel better.
Thursday, May 22, 2008

Elegant Grapes


This card was for a demonstrator-only swap. So, the pressure was on for me to create something wonderful. I love this card! The card base is 4.25x5.5 and is Elegant Eggplant. I used the Watercolor Vine Jumbo Wheel along the top with VersaMark, and heat embossed with clear embossing powder. While I was embossing anyway, I decided to add Happy Birthday (from It's Your Birthday set) in VersaMark, and clear emboss that too! I then stamped this elegant grape (from Fruit Stand) in Elegant Eggplant on Very Vanilla cardstock. Used Ticket Corner punch on the corners, and sponged with EE again. Layered So Saffron over Old Olive and taped ribbon to the back of that. Ran the ribbon (Elegant Eggplant 1/4" Grosgrain) to the other side of card and looped through some Antiqu Brass Hodgepodge Hardware. Taped again under bottom of layers, and glued to card. Put Dimensionals under the grape and lined up over the layers. Give it a try! Easy card, but it's very elegant, and people will think it took you forever (which of course it did, but only because you couldn't stop playing with your stamping stuff!).