Welcome to A Stampers Paradise!

You've stumbled upon my escape from the daily grind! I hope you enjoy what you see here. I am a SU Demo who loves trying new techniques, holding card making classes, creating techniques of my own, and most recently blog design, I love anything stamping related! I hope you'll stay a minute and come again! I'd love to know you were here, so feel free to leave comments!

Showing posts with label Punches. Show all posts

Friday, May 27, 2011

It's a HeAtWaVe!

 Whew ya'll. It's hot in NC this week! Temps in the 90's with horrible humidity! This month's theme for a month long swap I play in is 'SUMMER', so every Monday, I mail a summer themed card to my assigned partner for the month. Here are two that I have sent to her! The first card was SO MUCH FUN! Nothing but punches used to create this fun flamingo! I saw a card VERY similar on a demo site, and tweaked it a little, and it's one of my favorites! The flamingo is made completely out of the 2-Step Bird Punch! It's all in the details....the sand is sprayed, everything is sponged, the water is crimped, the birds are doodled. It took a while, but it was worth it! I will be making a couple more! These would be fun summer birthday cards!
This one is a whole lot more simple. It uses Awash with Flowers stamp set, and the sentiment is printed using My Digital Studio from SU, which amazingly...my new printer produces the exact SU colors! Bonus!!!!

Hope you guys like these! Supplies are all SU, like always! I will see you soon!

Happy Stampin'

Monday, April 4, 2011

BuStEd!!!

I have been called out by a great friend for letting my blog get so far behind....OUCH! She was RIGHT! So...you aren't getting my usual picture quality and I haven't had time to edit the pics or watermark them...but here they are!!! I really HAVE been stamping...just not updating my poor blog regularly...LOL! Below is a card I designed for my club last month. The tulip is made with the Owl Punch, and some ovals. Isn't it great?
 And here's a really simple one I threw together for a swap! Super quick!
 Here's another swappie! I used the Inlaid Embossing technique for the striped background. The lantern is made by running a circle through the crimper...you know the tool collecting dust that you haven't thought about it eons! Pull it out! These lanterns are so much fun!
So...(ahem...KELLI) I have been stamping;) I am REALLY behind on my online life, but for once my real life is just about in order. LOL! I will be back regularly....promise (the pinky kind).

Till next time....Happy Stampin'

Sunday, February 13, 2011

Love Bug Valentine!

Here's the card I made for my hubby for V-Day!!! I LOVE it! I saw a card in a gallery with a VW Bug made with punches and added to it. I created the landscape with a retired pack of DSP from last years SAB. I have tons of it left and am really trying to use it up. I wish the picture really showed the hood of the car better, but I waited until nighttime to shoot it. There's a lot of little details added to this card, and it was SO much fun. I LOVE Punch Art and do it all the time, but this was the most fun I have had with punches in a while!

As a teen, I was addicted to VW Beetles. I bought my first one with my own money when I was 15. My Dad and I worked on it together. When I graduated from High School in 99, my Dad surprised me by driving up to my cookout/party in the most beautiful shiny white 72' bug!!! Fully restored to be exact as it was new, perfect condition and ran like a dream. There's no more uncomfortable car in the summer, so we installed a fan in the floor and I loved this car for years! I just recently sold it, *sigh*. I haven't driven it since I had kids, so it sat for 6 years. I miss her very much. My hubby (whom I didn't know till I was 18) grew up driving bugs, too. So, I thought this card would be perfect!

The list of punches is long, and I may accidentally leave one or two out, but here's my best shot without my notes:

Word Window
Horizontal Slot
Modern Label
1 3/8" Circle
3/4" Circle
1/2" Circle
2 x 1 3/8" Oval
1 3/4" x 7/8" Oval
1 3/8" x 5/8" Oval

And the top body part of the car is a 2 3/4" circle from a cutting system.

Sunday, October 31, 2010

Super cute baby card:)

My husbands nephew (I guess mine too, though he's only a couple years younger than me) and his wife are having their baby shower today in celebration of the upcoming arrival of their first child, a girl they will name Brooklyn. It's a Halloween baby shower, which is a little different, but I decided to make my card pure baby, minus any Halloween. I hope they like it. I saw a sample of a card on a demo forum by Stephanie Sullivan, and she got the baby punch idea from Ellen Kemper. So, there's plenty of credit to go around for the idea for this precious baby! I chose a color palette of Chocolate Chip, So Saffron, and Pink Pirouette. It's soft, yet modern and feminine and works well for this card, I hope;) I ran some Pink cardstock through the Big Shot with the Square Lattice embossing folder to get some texture, then punched 3/4" circles from that and adhered to the base. I will list all supplies below, as well as a separate supply list for just creating the baby. One you have the pieces, it's obvious how to put it together. It's not often I get to make baby cards, so I had a lot of fun with this one!

Supplies:
Stamps: Teeny Tiny Wishes (inked with marker, each word one at a time stacked)
Ink: Blush Blossom, Chocolate Chip
Paper: Chocolate Chip, Blush Blossom, So Saffron, Pink Pirouette, Whisper White cardstock and Bella Rose DSP (retired)
Tools: Big Shot, Square Lattice embossing folder, Crop O Dile, 1/4", 1/2", 3/4", 1", 1 1/4" Circle punches, Designer Label punch, Word Window and Heart to Heart punch.
Accessories: Sheer Pink ribbon, So Saffron Grosgrain, Styled Silver HPH, Dimensionals, Mini Glue Dots, SNAIL, Tombow Multi Adhesive, Signo Gel Pen

Baby Punches:
Body = 1 1/4" Circle
Diaper = 1 1/4" Circle (put back in punch and a partial circle taken out of one side
Leg = Heart to Heart punch
Arm = Word Window Punch (put back in half length and repunched, OR cut in half, hiding cut)
Hair = 1/2" Circle punch, with 1/4" punched on one side
Eyes = 1/4" Circle x 2...colored on bottom half with Chocolate Chip marker
Cheeks = Rounded pencil eraser dipped in ink pad
Pacifier = Crop O Dile hole on CS, overpunched with 1/4" circle for paci handle, punched piece from Crop O Dile punch is paci.

* Sponging lightly around each body piece before adhering adds depth to the finished baby.

Happy Stampin' and Happy Halloween everyone!

Saturday, October 23, 2010

A quick and easy one here...

I made this card for a fellow SU Demo here in NC that I am swapping with all Fall. We send each other one card per week, well, she does;) I stay a week behind and end up sending her two at a time. I am trying to do better! She didn't like this embossing folder, Elegant Lines, and I found that so surprising since it is one of my favorites. So, I have been bombarding her with samples and pictures using this folder. She likes it now...Mission Accomplished...LOL! She and I have never met, but have so much in common! I hope she likes this card. It's simple and clean, but I think it kind of pops regardless! It's super easy to duplicate, so if you like it, feel free to CASE!

Supplies:
Stamps: Whimsical Words (SAB 2009 - retired)
Paper: Whisper White, Crumb Cake, Rich Razzleberry CS
Ink: Rich Razzleberry Classic Stampin' Pad
Tools: Wide Oval Punch, Scallop Edge Punch, Big Shot for SU!, Elegant Lines Embossing Folder
Accessories: Rich Razzleberry Satin Ribbon, Dimensionals, SU Anywhere Glue Stick (I had run out of SNAIL...that will never happen again, though our Glue Sticks are phenomenal!)

Friday, September 17, 2010

Christmas Doors...

These were so much fun to make, and super easy to do more than one at a time! I sponged around the edge of the card to give the door some depth, and the edges of the door sections are heavily sponged on the edges to they look like they are actually raised. The doorknob is a Silver Brad, but it looked way to plain on the card by itself. So, I punched a Modern Label piece, and stuck it back in the punch to make it tiny. I think it's a great shape for this, and I have never seen it done, so it's a truly original idea, which are hard to come by these days! Doesn't mean noone else has ever thought of it, just that I have never seen it, so it's original to me. If you have this punch, give it a try!!! The wreaths are made from circle punches (1 inch circle, overpunched with 1 3/8 circle to make a ring), then the tiny scallop from Itty Bitty Punch Pack was punched a lot and layered on the ring with Tombow Multi. The bow is a SU Sizzlit, it's the Beary Girl Accessories from the Build A Bear line! Both of these had to be sent out for swaps, but I will be making MANY more of these. I think a saying for the inside would be 'From Our Front Door To Yours, We Wish You A Merry Christmas', or something along those lines! Hope you like it, and as always, on to the supply list!
*
Sahara Sand Ink/CS, Real Red & Garden Green CS
PUNCHES...Modern Label, 1" & 1 3/8" Circle, Itty Bitty Punch Pack, Curly Label
Beary Girl Accessories Sizzlet
Dimensionals, Tombow Multi, SNAIL
SUO!

Wednesday, September 15, 2010

A White Wedding Wish....

We had a wedding to attend this past Saturday for my husbands co-worker, and for whatever reason, I waited to make their card right before running out the door to the ceremony! I have made a very similar card in the past, but it wasn't embossed, and was rectangular instead of square, I like this one better=) I don't know anyone else getting married, so I won't need to make another wedding card for a while. I love making these! I always do wedding cards all white, it might be an excuse to avoid color combo exploration:) Their wedding was beautiful and I hope they liked the card!
*
All Supplies SU!
Whisper White CS, Glossy White CS, Mulberry Paper, Brushed Silver CS
Encore Silver Ink
Teeny Tiny Wishes for the sentiment
Ornament Punch, Boho Blossoms, Word Window, Modern Label, 1 1/4 Circle
Elegant Lines Embossing Folder with the Big Shot for SU
White Organza Ribbon, Clear Rhinestone Brad

Tuesday, August 24, 2010

Life is like a bowl of cherries!

This post is a before and after kind of deal. I made this card for an Alphabet Swap for an online swap group. Obviously, we are on the letter 'C'. After struggling with many ideas: coffee, cats, cute, etc, I finally decided on 'Cherries'. Here is the finished card. I made this card last night, it was ready to mail. Then this morning it was bothering me...something just wasn't right, so I 'finished' it this morning. I don't always include the letter on my card, but this card seemed to need something in the bottom. Let me know if you think it's better after I finished it or before. This card uses SU new color, Cherry Cobbler paired with Old Olive. The cherry stamp is from Tart & Tangy, stamped with VersaMark and embossed with Clear Embossing Powder. It made a cute background without having DSP in these colors. The bowl, cherries, stems, and white plate they are sitting on are all made from SU punches. The cherries were punched out of Cherry Cobbler CS that I embossed a big square for shininess before punching. I used the Dotted Scallop Ribbon Border punch that I just got, too! And below is the 'before' picture that I decided was too plain.

Supply List:
Cardstock: Whisper White, Cherry Cobbler, Old Olive
Ink: VersaMark pad, Old Olive Marker, Signo White Gel Pen
Stamps: Tart & Tangy
Punches: 1/2" Circle, 1 3/8" Circle, 1 3/4" Circle, Small Oval, Scallop Circle, 2-Step Bird, Dotted Scallop Ribbon
Dies: Big Shot with Scallops #2, Perfect Dots Embossing Folder, and Wingo Zingo Alphabet Die (by Sizzix)
Accessories: Clear Embossing Powder, Mat Pack, Dimensionals, and Glue Dots

Wednesday, August 18, 2010

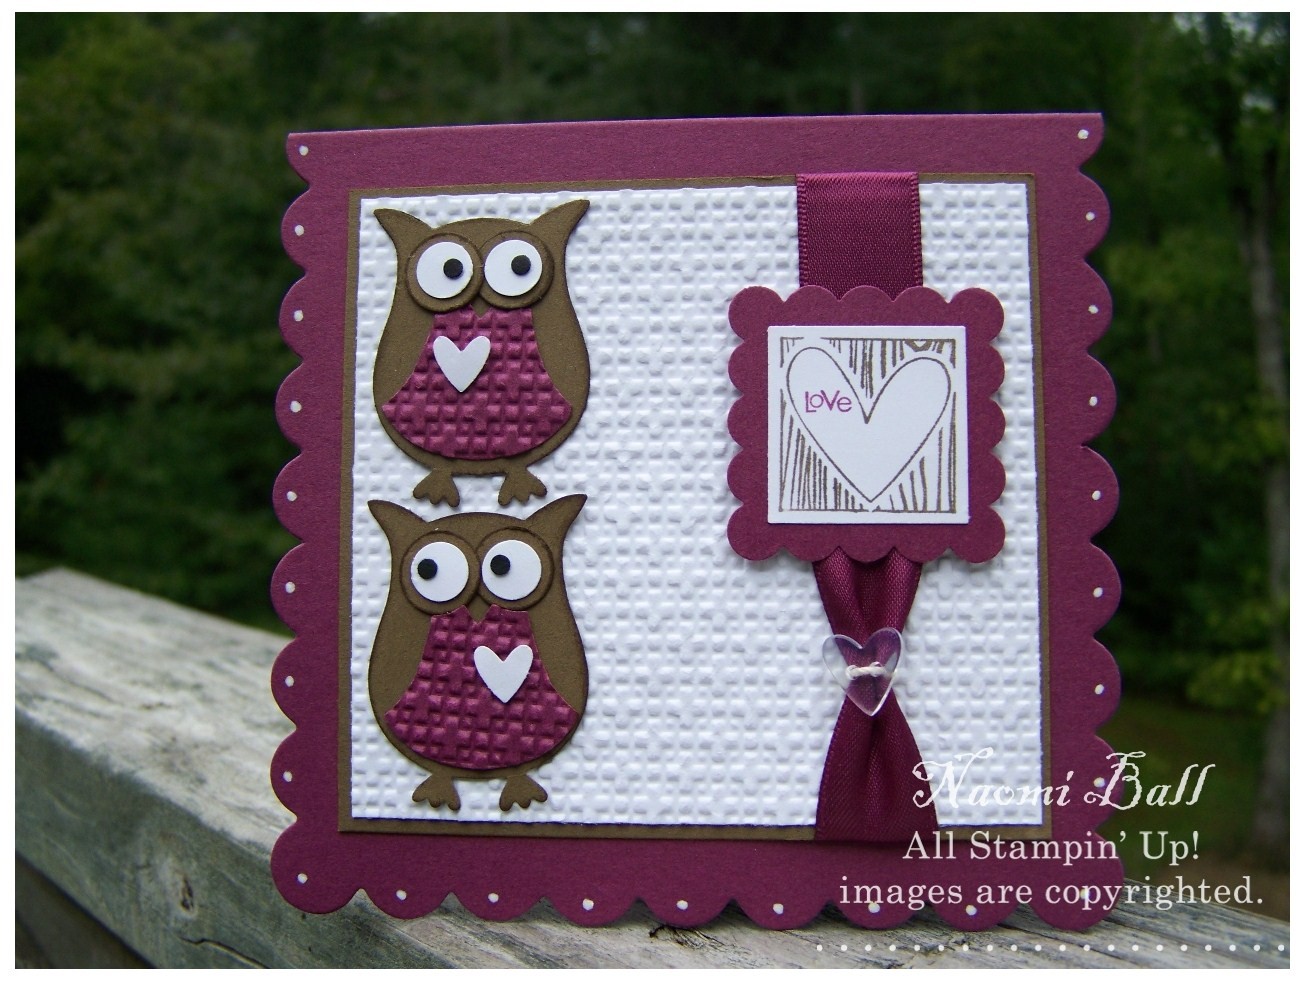
Hoo Loves You???

Hey, everyone!!! I made this card for a Fall swap, I actually made two of these for two separate Fall swaps. I usually do reds, browns, and oranges for Fall. But, Soft Suede and Rich Razzleberry felt Fall-ish to me this time! I think most of us think of owls at Fall, and I definitely wanted to use my brand new 2 Step Owl Punch! Isn't it AWESOME??? I am a punch addict, and this one is a new fave!

So many elements go into making a card work. Colors, textures, layers, focal points, embellishments, and many more. This card makes full use of many of those, whereas I generally keep things a little simpler.

I started with the Rich Razzleberry base as a rectangle A2 card. I decided it needed some UMPH, so I ran it through the Big Shot with SU's Scalloped Square Bigz Clear die! Perfect. I used a Signo Gel Pen (also sold by SU), to make dots on each scallop so the base didn't seem plain and forgotten. The layers are Whisper White and Soft Suede. The Whisper White layer is also run though the Big Shot with the Square Lattice Embossing folder. The Razzleberry part of the owls is also embossed with the same folder. Pulling those textures together makes so much difference. The owl punch includes the tiny heart I put on their chests. The edges of the owls are sponged, and the base of the eyes is run across the ink pad.

I then simply ran ribbon and taped it to the front and back of the layer (saves so much ribbon as opposed to bulky bows that don't mail well anyway!), and used a heart Bitty Button tied with crochet thread around it. The stamp is from Cute by the Inch, a new Level 2 Hostess Set. It's on a 1" white square, layered on Rich Razzleberry punched with SU's Scallop Square and popped up over the ribbon on Dimensionals. For the image, I used SU markers to color the word LOVE with Rich Razzleberry and the rest with Soft Suede.

I know it seems I went into way more detail for this post than I usually do, and you're right, I did. Lately, I have had a lot of messages asking how I put something together, or how I obtained a specific effect, or to share my tips for layering and tying things together. For cards with more detail, I will make an effort to go into more detail for those who want to know. If you have more questions, please feel free to contact me through my profile, or leave a comment here!

Thanks so much for stopping by, I hope you like my take on a Fall card!

*Owl see you next time!*

Saturday, May 1, 2010

Close To Bermuda Birthday

Here's a quick card I threw together last night for my club hostess meeting today. I am not a Close To Cocoa fan at all, but am trying to use up some of the colors that are leaving. And, I did like how it turned out with Bermuda Bay! I found a very similar card on a Demo site, and loved the layout. She had ribbon under the circle pieces and a bow tied on the side. Lo and behold, I don't have enough Bermuda Bay ribbon left to do this for as many cards as I needed to prep. So, I dug around and found my Bermuda Bay DSP, and cut strips of the Polka Dot design page. Not the same as ribbon, no, but in a pinch, it will do. I made the bow tie style ribbon piece by folding a 4" piece in to the center on both ends, adhering with a small dot of Tombow, then wrapping a 1 3/8" piece around the center, adhering in the back with another drop of Tombow. All in all, I like this card, and was happy I found a quick substitute for the ribbon! I hope my club enjoys making it later today.

Stamps: Circle Circus, Teeny Tiny Wishes
Paper/Ink: Bermuda Bay DSP and CS, Close to Cocoa, Whisper White, Signo Gel Pen
Punches: Modern Label, Word Window, 1 1/4 and 1 3/8" Circles, Scallop Edge

Have a great weekend everyone! I am anxious for my stamping buddies to get here, I have had a rough week, and there company always lifts my spirits!

Tuesday, April 27, 2010

Sometimes you just don't need color...

Ahhh...was this ever a hard one!!! I have only done a handful of all-white cards before. And, I actually enjoy it. However, this one is for a swap group, and the theme was White Only. Easy peasy, right? WRONG! I thought I had a full pack of Whisper White CS, I DID NOT! OOPS! I am COMPLETELY out! I had to scour my scrap piles and drawers to come up with enough white pieces to make the flower, and luckily found a wide strip in a card kit I had leftover from a workshop! The base is Glossy White CS, and I have also used White Mulberry Paper. This is completely inkless, although I was tempted to white emboss something on the base. I now have a few inches of white paper, and do not know if I can wait till Sat to order more at the club meeting. Anyway, I love the way this turned out. Sadly, I have to mail it out to my swap partner. Which is unfortunate as I have a wedding to attend on Sun, and can only think how perfect this would be! Maybe, just maybe I can dig around for a few more precious pieces!

Supplies are SUO! Whisper White, Glossy White, and White Mulberry Paper
Ornament Punch, Boho Blossoms Punch, Petals A Plenty Embossing Folder, Whisper White Organza Ribbon, and Dimensionals under the flower.

===For a little texture the flower petals have veins drawn in the with the end of my Bone Folder. They are also slightly curled. I have no idea how this will fare in the mail, so I am taking a few minutes longer to enjoy it before it hits an envelope. I hope the recipient loves it as much as I do!

Saturday, March 27, 2010

Circle Circus...

Here's yet another card for the swap group I now LOVE being in! This card was a sketch challenge, which was basically a strip across the middle, three circles on the left, and three lines of sentiment in the bottom right. It was an extremely simple sketch, so I kept the card simple and clean to match the lines of the sketch. I did a little paper piercing under the sentiment, which adds just a little to the plain base. I love this one! I hope the the recipient enjoys my swap!

Stamps: Circle Circus, Whimsical Words (SAB)
Paper: Kraft, Bermuda Bay, Whisper White
Ink: Bermuda Bay, Melon Mambo, Rich Razzleberry
Accessoris: SU Circle Punches, Dots Embossing Folder (with the SU Big Shot), Mat Pack, Paper Piercer

SUO!

Tuesday, March 23, 2010

Wings on a Card Swap...

(Click on photo to enlarge)
Here's another card I made today (the vintage was made this afternoon, too). It is for the same swap group, for a swap themed Wings On A Card. I have really used so many butterflies lately that I thought it would be fun to use the 2-Step Bird Punch from SU for this card! The Vanilla background is embossed with the Big Shot. I do not like the So Saffron background behind the bird, at all, but once I decided it needed more vanilla it was already put together. I LOVE this punch!

Brocade Blue, So Saffron, Very Vanilla
2-Step Bird Punch, 1, 1 1/4, 1 3/8" Circle Punches, and Scallop Circle
Friends 24/7 Stamp Set
Mat Pack used for the sewing down the side
--SUO

Saturday, March 20, 2010

Saturday Morning Stampin'!

Ahhhh....finally, just 2 hours before we have to leave for a birthday party, I got the birthday girls card all done! I LOVE Bermuda Bay and Melon Mambo and really wanted to use them together only adding white. Generally, for a kids card, I wouldn't do anything like this, but this is what hit me! The flower is the Ornament Punch, the leaves are the 5-Petal Flower punch, center of flower is the biggest from Boho Blossoms punch. The flower petals were run through the Big Shot with the SU Dots Folder. A Clear Rhinestone Brad finishes the flower off with a little sparkle. Sentiment is from Heard from the Heart, and colored with In Color Markers for the two tone. LOVE this ribbon, it's Polka Dot Grosgrain. I added just a little fancy with the Scallop Trim Border Punch along the bottom edges. The inside is white with all corners done with the Scallop Trim Corner...didn't remember to take a pic until I had already written in the card (with a Melon Mambo marker of course☺). I hope she likes her card!

I am finally starting to make some headway catching up on my blog. 'Inky Ones'....I will make rounds tonight. I can't wait to visit you all!

If you're in the South like me, enjoy this beautiful weather this weekend!

Happy Stampin'!

Thursday, January 14, 2010

Just For You, Neighbor!

I am LOVIN' the NEW SaleABration (SAB) brochure! I sat down to play with some of the items I preordered, and came up with this bright and cheerful card! Here in NC, we are experiencing COLD like we don't usually have (in the teens) and I just need a bit of Summer, so I chose some bright colors! This little house set is so cute! It comes with 3 houses, 3 different roofs, a few trees, and a cloud (which also makes nice bushes between the houses). I am going with the Clear Mount option from now on, so that is what this set is, but it is also available in Wood Mount. I stamped these using the In Colors, and punched with the 1 1/4" square, and layered on 1 3/8" squares. I LOVE the new DSP from SAB to go with this set, it's called Welcome Neighbor!
Here's a close shot of the ribbon, my hardware, and the paper! I really like this one, these colors will be sorely missed when they head out! I fall in love with the In Colors every time, though!
CS -- Bermuda Bay, Melon Mambo, Old Olive, Whisper White
Ink -- Bermuda Bay, Crushed Curry, Melon Mambo, Old Olive, and Whisper White Craft
DSP -- Welcome Neighbor (SAB)
Punches -- 1 1/4", 1 3/8" Square, Scallop Edge, Scallop Circle
Accessories -- Styled Silver HodgePodge Hardware, Bermuda Bay ribbon

Sunday, January 10, 2010

My January Club Projects....

Hey, friends! It's great to be back in the blogging loop! The holidays were wonderful, and I enjoyed them immensely, but am glad to be back to the routine of everyday life! My Jan hostess club theme was 'Be My Valentine'. I generally focus on a Holiday coming up the next month so my club members have time to plan and order for it. This card is our 'Man' card for Valentine's Day! I used the NEW set from the Occasions Mini, called I (Heart) Hearts. I am the proud new owner of ALL the SU Clear Blocks and am blown away by their beauty and quality! So, I have this set in the Clear Mount. This is a wonderful heart set! The sentiment is from Teeny Tiny Wishes.

CS--Real Red, Soft Suede, Whisper White
Ink -- Read Red, Soft Suede
Punches -- Modern Label, Word Window, 1/4" Circle, 1 1/4" Square
Stamps -- I (Heart) Hearts, Teeny Tiny Wishes

I like including a 3D item, gift, or package idea at each meeting. This month we did paper bows made of out Designer Series Paper. They were a huge hit! They are easy to make, and seeing how you can make 24 large ones out of a $9.95 pack of DSP, you can't even buy NICE bows for that price at the store! This tutorial is on SCS. However, it is only for the large size. I created the small size by switching from 6x12 paper to 3x6, and making my cuts at 1/2" instead of 1". It worked well, but is a little harder to hold together before using the brads. I cannot wait to make more of these! This particular DSP is retired, it is called Bella Rose.


And this little one was lots of fun! These are the NEW Hugs Notes from the Occasions Mini. The Whisper White CS is already cut into the scalloped rectangle! They sell in packs of 20 for $4.95! What a deal! I think I will buy extra packs to use as focal points on card fronts when I am too lazy to pull out my Big Shot ☺ The vase is the Ornament Punch, with the bottom point cut off.
CS -- Real Red, Hug Notes, DSP from a retired Hostess Pack, Whisper White
Ink -- Read Red, Garden Green (marker)
Stamps -- I (Heart) Hearts
Punches -- Ornament, Heart to Heart
-- Dimensional -- under the checkered heart
I hope you all enjoy these! I loved making them, and my club seemed to really enjoy these projects! I love Valentine's Day!

Saturday, January 2, 2010

Punch Templates!!!

I made 10 of these for my hostess club for our Christmas Party gifts!!! It is a punch of EVERY SU punch currently available, except for corners, slits, etc. I still need to do those, but feel they are irrelevant as far as needed them for sizing, etc. I cut a sheet of white cardstock into quarters, leaving them 8.5 inches long, and they ended up being 2.75 inches wide. It took 6 strips for each one. I saw many templates online for printing them punching, but wasn't happy with placement, etc. So, I did sit down and write them out by hand. I had them laminated professionally for a good heat seal and heavy laminating paper as these would be handled often. I punched each one with the Crop O Dile in the top corner (all 6 sheets laminated at ONCE!), and put them on a book ring! I LOVE these! They are sturdy and you can lay them right over the stamp itself or the catalog picture to see what you need! They took a few nights to get done, but for sanity sake, I didn't want to marathon these, so I did them slowly. I am really happy with the finished product, and the ladies seemed to like them!

Monday, December 7, 2009

3D Ornament...


You know those times when you sit down to stamp and can't think of a single thing to make? I hope I am not the only one who has those...LOL! All I knew was that I wanted the card uncluttered and featuring a 3D Ornament. So, I pulled out my Ski Slope DSP from last year (SO thankful I bought 3 packs of it, it is my all time favorite!), and punched 8 Ornaments. They all got folded in 1/2, glued back to back, then added to a scrap cardstock Ornament for sturdiness. Then, I was stumped. I had nothing...no ideas, nothing. I went through my scrap drawer, and found the previously scalloped Old Olive strip, as well as the Petals A Plenty embossed Chocolate Chip scrap. I decided to cut some Real Red to mat between them, and that was it! The flower on the Baja Breeze base is from a retired Christmas set, and actually was colored with the VersaMarker, and stamped onto the card as it had a circle image around it. I finished it with Merry Christmas in Chocolate Chip in the bottom right corner. It's plain and simple, but when doing all different Christmas cards, that's what I was going for!!! I do have some more elaborate cards to post tomorrow, I hope that will make up for these last two simple ones.
Merry Christmas Everyone!!! I am enjoying crackling fires, a fresh Christmas tree and nighttime Christmas movies with my little girls. I hope you are all enjoying this special season as well!

It's beginning to look a lot like Christmas...

I am LOVIN' the Delightful Decorations stamp set and the Ornament Punch so much this Holiday Season. Almost all of my Christmas cards are made using these this year! This one is a color combo I haven't use before, and I LOVE it now! I chose to pair Real Red, Whisper White and Soft Suede for this one. This is one of the cards I created for my Nov Hostess Club meeting. I 'accidentally' discovered that I really like the Top Note Die in more than one color. It's always the blunders that teach you something new! I ran the beautiful White Organza ribbon under the Top Note, and the red ornaments are stuck on with Glue Dots, the suede one is popped up on Dimensionals. The Silver Elastic cording is going fast, I use it on everything! It works beautifully for 'hanging' these ornaments. I finished off the JOY ornament with a small Clear Rhinestone brad. This is an easy card, very quick to make and I think it packs a big WOW for it's simplicity!

***To the ladies in the Blog Group...please forgive me for my recent absence! I will get to your blogs this week, I PROMISE! We have had a busy month, a death in the family, a huge pay cut, and we haven't shopped for one single Christmas gift yet. It's been one of those months...I am finally starting to catch up, and can't wait to visit all of you. And, over this week, I will catch my blog up as well. Many of my recent projects have been for my Club Christmas Party, which was Sat, and I can't wait to post pics of those now that the party is over!***

Monday, October 19, 2009

Jelly Belly Halloween...

Here's the Halloween card I planned for my hostess club for our Oct meeting. Everyone liked it, and it's fun and easy to make! Jelly Bellys are probably my all-time favorite candy, and to me there is no other jellybean, I happily pay $7/pound, no questions asked for my beloved JB's, luckily I don't eat sweets often! Here I chose Wild Blackberry, the color is a deep purple that is almost black and it really compliments this card! To make this card easier to make, we filled the cups, then stuck them to acetate, and then trimmed the edges. Once that's in place with a little glue, it's easy to set your layers. Took me a while to figure that out, but it's a great trick!

For this card, I chose an odd color combo, Basic Black, Green Galore, and Lovely Lilac. Most people do orange, but it just seemed played out to me this year, I wanted purple, and somewhere it works! We used the Sweet Centers stamp set, 1 3/4" punch, and the Sweet Treat Cups from SU for this card. To add a little edging, we punched the purple layer with the Spiral punch, and those openings worked perfectly for running our black ribbon through for the X. The Happy Halloween is from All Holidays, and punched with the Modern Label punch. We took our purple scrap (from the tearing) and punched 1/4" holes and stuck those on with Glue Dots. I will be making many more of these! I just hate that you have to tear the card to get to the goods, but you know for JB's, I believe I would tear it in a hot minute...LOL!