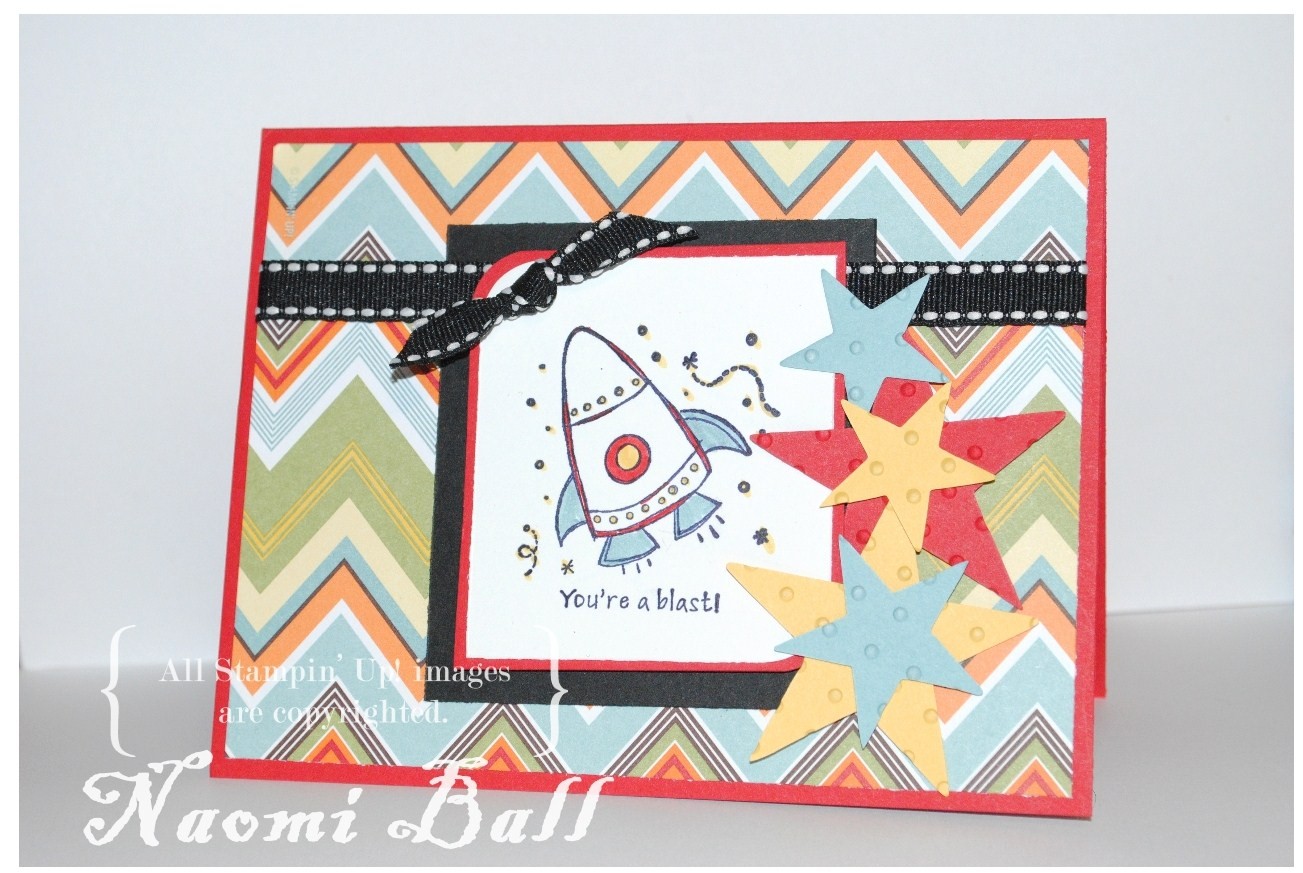
Here's a card I made for a sketch challenge. It's for a swap group, and I do the sketch designs for the group. When I designed the sketch, I had a flowery card in mind. Needless to say, when I sat down with the sketch, I ended up with something completely different! I really like this fun, bright card! It would make a GREAT birthday card for a little boy (or a grown-up boy;). I hope you guys like it, too. All supplies are SU (except the ribbon, no clue who makes it). I will do a supply list at the end of the post. Below is the sketch, and I would love to have you use it!
Paper: Greenhouse Gala DSP, Real Red, Basic Black, Whisper White Cardstock
Ink: Basic Black Stampin' Pad, Real Red, Daffodil Delight, Baja Breeze Stampin' Write Markers
Stamps: Pun Fun
Accessories: Corner Rounder Punch, Big Shot, Stars Die, Dot Impressions Folder, Dimensionals, Ribbon
Sketch is designed in My Digital Studio
Showing posts with label Kids Cards. Show all posts
Sunday, February 27, 2011
Sunday, October 24, 2010
Eek You're Sweet!!!
Who doesn't love Halloween goodies? This is one of the three projects I designed for my Hostess Club this month. I LOVE using the Sweet Treat cups, and for just $2.95/dozen, they are very affordable to use on your projects! We created a little 'door' behind the candy and the EEK tag pulls up to open the candy area. We had a lot of fun making these and this is what I am giving to my girls before we head out to Trick or Treat. I won't make them smell my feet, but I will give them something good to eat :) Below is a picture of the candy area empty with the tag up so you can see how the door works.
Supplies:
Stamps: Sweet Centers
Paper: Basic Black, Tangerine Tango, Whisper White Cardstock
Tools: 1 3/8" Circle, 1 3/4" Circle Punches
Accessories: Sticky Strip, Sweet Treat Cups
Labels:
Club Projects,
Halloween,
Kids Cards,
SUO,
Treat packaging
Friday, August 13, 2010
You're A Blast!!!
(Click on picture to enlarge for detail.)
Ahhh...I had SO much fun making this one. It's my first Tent Card, and I learned a lot! I made many mistakes, but next time I make one, I will know! I couldn't get a good side shot, and I tried a zillion times:) The is a standard A2 card, however instead of being open at the bottom, it's actually attached to the back with a step/valley accordian piece to give the card a sturdy base, and depth. Messages would be attached to the back. This card could have been so much more, but I realized a lot of things too late. I will be making more!
*
Ahhh...I had SO much fun making this one. It's my first Tent Card, and I learned a lot! I made many mistakes, but next time I make one, I will know! I couldn't get a good side shot, and I tried a zillion times:) The is a standard A2 card, however instead of being open at the bottom, it's actually attached to the back with a step/valley accordian piece to give the card a sturdy base, and depth. Messages would be attached to the back. This card could have been so much more, but I realized a lot of things too late. I will be making more!*
The inside of the card is the 'sky' background for the rockets trip! It's SPONGED (can you believe it? LOL!), then the sun/moon is heavily sponged, and twisted to get the haze around it. I used Itty Bitty Backgrounds for the stars. I ran some scrap paper through the Big Shot with Stars #2 die, and detached the sentiment from the rocket image. The rocket is not tied or jump ringed like the other tent cards I have seen. I wanted the actual illusion of flying, so it's attached with acetate.
*
I also used some Styled Silver HPH, retired Silver Cording. There's Crystal Effects on the lights and window of the rocket, which didn't show in the pic. All the stars also have a touch of CE on the tips.
*
Colors: Pacific Point, Daffodil Delight, Real Red, Pumpkin Pie
Stamps: Pun Fun, Itty Bitty Backgrounds
Dies/Punches: Stars #2, Perfect Polka Dots embossing folder, Word Window Punch
Accessories: Sponges, HPH, Cording, Crystal Effects
*
As usual...SUO. I can't wait to try another one and post for you to see that I can do this better...I think:)
Labels:
Kids Cards,
Special Folds,
Sponging,
SUO,
Swaps
Friday, June 4, 2010
Graduation and a Sock Monkey!
My little girl graduated Preschool yesterday! I knew that her cap was going to be red, if I had known the ribbons would be yellow, I would have matched the monkeys:) I have NO graduation sets (although I had her graduation and a niece and nephew graduating High School next week), and I was stumped as far as her card goes. If you have followed me for a while, you know my DH and I made homemade Sock Monkeys for our girls, and they love them. So, I pulled him out. I made the cap using square punches (partial punches) and a brad and silver cording. It's popped on a dimensional...here's a close up for the flag and cap...
The flag is also in Sock Monkey stamp set, I stamped it on the white, and again on red. I cut the flag out of the red and attached with glue dots. We use the YMCA Preschool, so that's what I put on the flag. I really like how the hat turned out, and Chloe was amazed that his hat looked just like hers. Also, the rough coloring is intentional! I don't want you to think I cannot color. Sock monkeys perfectly blended are so odd, it's not how they look IRL, so it's not how mine looks. This look is also fast and easy!
And here is a pic of Chloe receiving her 'diploma' from her Assistant Teacher. The lighting was terrible in the gym, I am hoping some of the others came out better, if not I will be fixing them all before they are usable. I can't believe she is off to Kindergarten this Fall. Where has this time gone? And my baby is only 2 yrs behind her and will likely go to Preschool this Fall to help with the adjustment of her 'Sissy', and BFF who lives next door going to K at the same time.
Labels:
Kids Cards,
SUO
Saturday, April 3, 2010
Kids Easter Projects...
True to form, I am running behind☺ Easter morning is just hours away, and I finally finished these cards for my two little girls. SORRY for the bad pics...I JUST finished these and prefer to take pics in daylight. These cards were so much fun to make! We have already attended a couple egg hunts this year, and my girls are all about that. So, I decided to make Easter Eggs on their cards. The sky is sponged with Bashful Blue using a few scraps of DSP punched with the Scallop Circle as a stencil. Eggs are Wide Oval, in various Bold Bright inks. Paper is all Bold Brights as well. The sentiment is from Well Scripted.
These are the gift bags I made for my neice and my neighbors little girl, who is BFF to both of my girls☺ These are white lunch bags from Target and I promise they are super cute IRL! I stamped the chick and bunny from Eggcoutrements in YoYo Yellow and Lovely Lilac, then used the Hugs Notes in Glassine Envies to hold the tags. These are filled with punch balloons, Easter pencils, Peeps (YUM!) and a Hershey's Marshmallow Egg. These are both extremely simple and low-key but I wanted to share what I did for the kids. I cannot wait to see my girls get up, dig through the baskets, put on their dresses and go to church!
I hope everyone will take time to remember that Easter has a real meaning. Let's celebrate what it's about!
He is not here, He is Risen....Luke 24:6...AMEN!
Labels:
Easter,
Kids Cards,
SUO,
Treat packaging
Thursday, February 11, 2010
Chloe's Handmade Valentine's
This is my 5 yr old, Chloe, and her 3 yr old sister, Tara. Not sure what's up with Chloe's goofy grin! These are the Valentine's we sat and made tonight for her Preschool class party tomorrow. We used two images from Pun Fun, and some DCVW cardstock (I think that's what it's called, I only use SU, and let the kids use the other stuff). We stamped the images, and she colored them with SU Color Pencils. I scored and punched holes in these to hold the suckers she picked to give to her friends. Her sister separated the colored ones into piles for me to finish cutting out. We had a lot of fun making these, and I think they are cuter than anything storebought...plus it was a great experience. Below are some more pics!
Labels:
Kids Cards,
Treat packaging,
Valentine's Day
Monday, December 7, 2009
Think Tink!
Sadly, I just realized that I never posted the card I made my oldest daughter for her birthday this past Sept! I did post her little sisters card (their birthdays are 3 days apart) so I don't know how this got forgotten. It's nothing too special, but I wanted to be fair and post both of their cards, especially as they love to see my blog:) I don't even know who makes these supplies, the green textured cardstock is from a stack I got ages ago, the flower and epoxy sticker were in a bag a friend gave me. However, I again did a search for line art (like with my Ariel card for my younger daughter), and added a personalized birthday message to that. Tink is colored with Sharpies, and her wings are 2 Way Glue and Dazzling Diamonds. The pom poms on her shoes are Stickles, and her eyes and lips are coated with Crystal Effects. I just wanted to share her card!
Labels:
Kids Cards
Monday, September 14, 2009
Birthday Wishes from Under The Sea...
My youngest daughter turned 3 today!!! She is an Ariel fanatic, she just loves that mermaid, so I decided to make her an Ariel birthday card. Of course, I don't have any Ariel stamps, so I had to think. I GOOGLED 'Ariel Line Art' (cause if you google Ariel images, or Ariel clip art it's all in color), and adjusted the size down until it was small enough for my card front. I printed it on cardstock, and colored it in. This card is SO simple, I probably shouldn't blog it here, but it goes to show you don't have to go all out to make a nice card! I knew that Tara would want to keep this in her room and play with it, so I did not want any embellishments on it that would come off.This is not the best pic, I remembered to snap it right before giving it to Tara, so there was no time! However, the bubbles have Crystal Effects on them, as do Ariel's eyes. The coloring is actually a lot more detailed than the picture shows. This image was colored with Sharpies 36 Color Collection! Her hair has NO lines at all, I was amazed, it took some time to color, as I don't have the fine point Sharpies, but this looks great for what I used. Frosted Lace Stickles were used on her tail.
And here is the best picture by FAR!!! My little angel SO excited to have an Ariel birthday card!
Ink is Sharpie, and a couple SU markers
Image is digital and I can email to you upon request.
Big Shot was used with a bubble texture plate on the green.
Sorry for the bad pics and quick post. This week is just starting, we still have Chloe's birthday at home, a small family party for both kids, a friend's kids birthday party Friday, beach trip to pack for this weekend, I am on preschool snack duty all week, and the house is getting dirty, it's freaking me out. I am a neat freak who loves to clean, so needless to say, no more stamping till I catch up on cleaning!
Labels:
Digital Images,
Kids Cards
Thursday, August 13, 2009
I stepped out of my comfort zone...

This card is nothing of my normal style, but I love how it turned out. I decided when I sat down last night that I wanted to try something I have never done before. This is the busiest card I have ever made, with a lot of patterns and colors. I made this for a little girl who turns 4 this weekend, and I hope she likes it!!! All of the bling on this card is from a package my friend, Siobhan sent to me. I have no idea of the brand, as the entire packages are in Japanese, but I like using them!

Cardstock: SU Orchid Opulence, Gable Green, Whisper White
Pattern Paper: K&Company Specialty
Punches: SU 1/2, 3/4" circles, Photo Corners, Scallop Edge
Creative Memories Cutting System, Big Shot with Wingo Zingo Alphabet
Ink: SU Basic Gray, various SU Markers
Stamps: SU All Scallops, and cupcakes are from Studio G
I think that's about it, I am trying to use up hoarded embellishments, and paper!!!
Labels:
Big Shot,
Designer Paper,
Kids Cards,
Punches
Friday, October 17, 2008
Firetruck Birthday...
This is a card I just finished, snapped a pic, and am blogging now so I don't forget. I just made this for a kids birthday that is coming up soon, a precious little boy (whose mama happens to check my blog, but that's ok:). Last month we were invited to a birthday party for another little boy and my friend has ordered these diecut, precolored firetrucks to use on his invites and thank you's. I usually don't use things on my cards like this, but she gave me some of the extras, and I fell in love with the cute little firetruck. I happen to have a Dalmation (among 2 other dogs and a cat), so the little dog on the back makes me smile. I used Whisper White for the background, then cut Real Red cardstock, and used the Ticket Corner Punch on the corners. Then I used the CM Cutting System to make the big oval in the red. Cut a smaller oval out of Basic Black and lined it up underneath. The masked section of the white base is sponged in Real Red ink, and I did the black dots to coordinate with the dog using Bitty Basics stamp set. The firetruck is popped up on several dimensionals and centered in the masked area. I stamped Happy Birthday from Bitty Birthday with Basic Black, punched with Small Oval, sponged edges with Real Red, and layered over black punched with the Large Oval punch. Set white eyelets in the corners. Tied Red Gingham ribbon through, taped to back of layers. Then glued the front down. Now, with using this little firetruck, I did have to add some things to it, so it wasn't so flat looking. So, I punched holes in the wheels and set silver eyelets for rims. I used Crystal Effects on the tires and the windows. I added Clear Stickles to the dogs collar, and the lights on the truck, and I used a Silver Metallic pen to add 'metal' to the handles, grill and bumper of the truck. Those extra touches really make the truck POP. I hope you like it!
Labels:
Kids Cards
Sunday, September 28, 2008
Hippo Birthday... Catty CASE Challenge
In Sept, I challenged my hostess club to draw inspiration from or to recreate a project that is in the current F/W SU Catalog. Below you will find my example of the challenge...

This set is Pun Fun, and you can find the project I chose to case on page 61. As you can see, I left the layout exactly like the catalog example. I did change the colors. Have you ever before seen a Cameo Coral hippo? No? Well, me either, but I like it! I didn't have the felt flowers they used in the catty, so I stamped the flower image from Sock Monkey and cut it out and put a rhinestone brad in the center and stuck it on with a glue dot. Sewing is by hand, didn't feel like pulling the machine down, however I will make myself next time, by hand took too long. I really like how this card turned out! Sometimes, when I am out of ideas, I will look to the catty for inspiration. Usually not a blantant CASE, but I had to this time, as it was the challenge I gave out. I can't wait till the Oct meeting to see what everyone else did!
Labels:
Kids Cards
Thursday, August 14, 2008
Icecream Birthday
Well, summer is in full swing, which always makes me think of icecream! A very special little girl is turning 3 this weekend, and I decided she should have a 3-scoop icecream card! This card was very simple to make, I did it on my lap (my craft desk was full) in about 10 minutes. The base of the card is Lovely Lilac. The Whisper White layer was scored on all edges about about 1/4" to have that raised edge. Added pink eyelets to the corners. The icecream scoops are the round scallop punch, with all but 6 of the scallops cut off and rounded. The bottom scalloped edges are sponged in same color for texture. The cone is Creamy Caramel. It's a piece about 3" long by 1 1/4" wide. Simply cut from top outside to bottom middle on both sides for the cone. That is scored to make the texture as well, and sponged with CC ink to pick up the lines. I really loved this card, and I hope you do too! I got the basic idea off of Splitcoast Stampers, then just made it mine.
Labels:
Kids Cards,
Punches
Subscribe to:
Posts (Atom)